On Saturday, we attended a joint birthday party for "J," age 3, and "D," age 1. Two different families, but we (along with many of the other invitees) are very close with both of them, so it was wonderful being able to celebrate together!
Both families also happen to have a place of significance in my sewing "life." I wanted to sew gifts for both boys to commemorate that.
J's mom was the one who lent, and eventually sold, her sewing machine to me when I first got started. For J, I made a crayon wallet. I first heard of crayon wallets back in May, from one of my other friends, who had purchased some off Etsy for her kids and nieces. It seemed like the kind of thing that someone would write a tutorial for, and sure enough, some quick web searching turned up this tutorial.
It seemed a little tricky, but the blogger insisted over and over that it really wasn't that hard, so I took her word for it. Indeed, it really isn't hard at all! Once you get started, it quickly becomes clear how it all fits together.
I know that J loves anything with wheels, so I chose a Cars print for him. I actually got both types of fabric (the blue Cars fabric and the contrasting red fabric) at Walmart, of all places! My Walmart recently got rid of their bolts of fabric, but they do have an entire wall of precut 2 yard cotton pieces, including lots of Disney licensed stuff, for fairly reasonable prices ($6 for solids, $8 for licensed prints). I didn't have time to make it out to Joann's, so this worked out well.
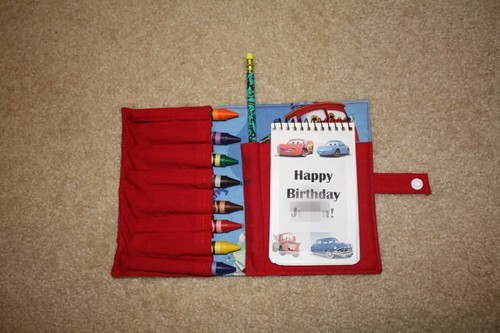
The finished product:

The outside, unfolded:

Inside. The pad of paper is from Target, and then I taped on a cover that I made using Cars clip art that I found online:
I love how this turned out and will probably make more of these for future birthdays and other events.
On to D's gift. D's mom is a Texas A&M grad (yes, this is the same D for whom I made an A&M sleep sack as a Christmas present), and D is also the only other cloth diapered baby I know. Now, early last year, immediately following Noob's birth, I really wasn't doing a lot of sewing. I just wasn't into it, with everything else going on. But when D's baby shower rolled around, I decided to sew some A&M wetbags as a gift. That project is what really got me started on sewing again -- and I haven't stopped since :) I recently came across the leftover A&M fabric from the wetbags and decided to use it to sew -- what else? -- a diaper!
The fabric is cotton, so I didn't want to use it directly over a layer of PUL (to prevent wicking issues) and I also knew that D's parents don't use fitteds. I decided to try a pocket with embellished tabs, as I've heard that even cotton works fine on those tabs, since they don't really get wet.
I used the Darling Diapers Unlimited pattern, size medium. I've shown off embellished-tab diapers I've made using this pattern in the past, but here are some pictures for how I actually altered the pattern to do it. I took the idea from this Diaper Sewing Divas tutorial (free registration required), but that uses the La Di Da pattern. For DDU, I followed the same directions to cut off the wings at the line connecting the elastic endpoints (marked by stars):

And I did the same for the wings:

The LDD tutorial talks about trimming the little "tail" that you get when you put the tab pattern on top of the body pattern. For DDU, there are two little "tails" that need to be trimmed, one on top and one on the bottom. See them here?

Final tab pattern with both tails trimmed:

I traced the tab pattern onto vinyl. This allowed me to position the pattern just right on the fabric, because I could see through the pattern. Do you see the shiny vinyl on top in the picture below? The blue dots mark the snap placements (for both a single row and double row of snaps):

Once I have the tabs cut out, I sew them to the body, then proceed with diaper construction as usual.
The final product:

I didn't get the logos placed on the tabs quite as well as I would have liked, but I think it looks OK still!

Inner is suedecloth with a modified welt pocket:

Insert is a Zorb II trifold with serged edges:

Folded up for stuffing into the pocket:

I hope the recipients enjoy these gifts as much as I enjoyed making them!
No comments:
Post a Comment