Showing posts with label serger. Show all posts

Tuesday, June 26, 2012

Quick projects

Why yes, I have been sewing... in fact, with my due date just a week away, I've been in full-on crafting mode. When I'm not trying to wrap things up at work before my five-month leave, working on the nursery, finding the baby stuff that's scattered all around the house, and oh yeah, taking care of zoo camp and swim lessons and, um, dinner and laundry and the other million things that come along with having two older kids in the house.

So yes, I've been sewing, just not so much blogging :) Anyway, a few of the projects will stay top-secret until the baby's arrival.

But here are two quick projects that I can share now.

First up, a baby project... trimmed prefolds. If you're not familiar with cloth diapering and specifically prefold sizing, a quick primer. Prefolds are those big squares of cloth that your mom may have used on you, or that your grandmother almost certainly used on your mom. Now, you might ask, "I know cloth diapers have come a long way, but how much innovation can you put into a big square of cloth?" Well, quite a bit, as it turns out. Gone are the pins and plastic pants of yesteryear, in favor of Snappis and cute, soft, and durable PUL covers.

One more recent innovation is the concept of "sized" or "perfect fit" prefolds. See, traditional prefolds are relatively long and narrow. Most parents work around this by folding down the extra length. This works fine, but it does leave a big ol' bump in either the front or back of the diaper, making it bulkier. "Sized" prefolds offer a simple solution: They are cut shorter, alleviating the need to fold down the extra length and therefore the extra bulk. The best-known "sized" prefolds are offered by Green Mountain Diapers (also known as GMD), but there are now some other companies offering a similar concept, e.g. Diaper Junction and Nicki's Diapers.

Thing is, the "sized" prefolds are in somewhat high demand, so while they certainly aren't expensive (usually about $1.50-$2.00 each), it's hard to find good deals. And I like good deals :) Especially since we have more than enough hand-me-down diapers for this baby, so if I'm going to buy anything else, it better be cheap.

I found a lady on craigslist selling brand new standard infant prefolds for $1 apiece. That's more like it. As it turns out, standard infant prefolds (usually sold with green thread on the edges) are the same width as the "newborn" size for most sized prefolds, just a little longer. Well, that's easy enough to fix in a minute or two at the serger. Here are two unprepped prefolds, one normal (on the bottom) and one that I trimmed (on the top):

WP_001246

Prefolds shrink quite a bit when they're initially washed. Here are two trimmed prefolds, a prepped one on top and an unprepped one on the bottom:

WP_001245

Two prepped prefolds, a trimmed one on top and a normal one on the bottom. The trimmed one is maybe 1" or 2" shorter than the normal one. We used normal prefolds on Noob, and folded down about 1" to 2" for his first three months, so I'm thinking these should fit just about perfectly, no need to fold down.

WP_001247

If you're wondering about specific measurements, the untrimmed prefolds were about 12" wide and 16" long. I trimmed off 3" to make them 13" long prior to prepping. After prepping, the trimmed prefolds are about 11" wide by 10" long. This is very similar to the dimensions given for newborn sized prefolds on the sites I mentioned above.

By the way, this same trick works to turn premium prefolds into medium sized prefolds. Noob wore that size from about 13 months (when he outgrew the standard infant prefolds) till potty training shortly after 2 years, and still had some room to grow in them.

I also took the trimmings and serged them together in pairs, to make doublers. We'll see how they work.

One last really quick and semi-related project. Littles got a big dollhouse for her birthday, but felt that the bedding on the included bed was not good enough for her dolls.

WP_001248

So I had her pick out some flannel, cut it to size, and serged the edges for a new blanket and pillow. The stuffing on the pillow? Trimmings from a prefold :)

WP_001249

It all took just a few minutes and made my little girl very happy. Perfect :)

Tuesday, February 21, 2012

Noob's nap mat

One of my earliest posts on this blog was about a nap mat that I made for Littles to take to preschool  It worked perfectly! She ended up using it until just a few months ago, when we stopped having her nap at school.

Between first trimester fatigue, the holidays, our China travels, and sewing Noob's training pants stash, I didn't have time to make a nap mat for Noob before he started preschool, so he's been sleeping on Littles' mat. But pink ballerinas aren't really "him," so I always planned to make him a new mat as soon as I had some time.

Let the record show that I originally planned to make this using a bunch of fleece from the great Joann's remnant bin sale of about a year ago, since I really need to use it up! But Noob is obsessed with trains as of late, so just before I started sewing the mat, my husband said, "Hey, why don't you do a train theme?"  That meant scrapping the remnant bin fleece I had gotten for cheap and had around the house in favor of buying expensive licensed Thomas the Tank Engine fleece (since, oddly, it's very hard to find train fleece that does not feature Thomas) -- but what can I say. My husband made me do it!

I made this in basically the same way that I did Littles' nap mat (documented extensively in the other post), with a few minor changes, which I'll get to later. The end result...

IMG_4416

Bottom of the nap mat and straps: Royal blue fleece (I was able to use some from the great remnant bin sale here)

Top of the nap mat: Flannel

Pillowcase: Thomas the Tank Engine woven cotton. (I got this a while back as part of a bigger fabric order, figuring I'd find some use for it!) I used my serger on this, rather than doing French seams like I had to do on Littles' nap mat in my pre-serger days -- sooooooooo much faster.

Blanket: Thomas the Tank Engine fleece, from Joann's

Here's a close-up of the pillow and top of the blanket. I made the blanket a little longer than I did with Littles', so it can come up and over the pillow a bit. But I didn't attach it to the side of the nap mat at the top, so it can fold down, as shown here (and above).

IMG_4418

Rolled up...

6919787591_bdb8d9d9c3_b

The light blue piece is a shoulder strap -- a new feature I added on this one. It's just a single layer of fleece, about a yard long. I thought that might be too short, but if anything, it's too long. It's very thin, by design: It lies under the mat when it's unrolled, so I didn't want there to be a big bump when Noob lay down. I don't love it, but it works OK for now, and it'll be easy enough to cut off in the future if I decide I really hate it.

Close-up of the name tag:

6773669488_c2ffff4400_b

The light blue is fleece again. Gahhhh, this picture makes it look like the edges are really crooked -- I promise they're not that bad in person. For the tag itself, I used printable fabric that I got on clearance at Joann's a while back. It's canvas material that you can stick in your inkjet printer and print on directly. It's not supposed to be washed, so we'll see if we remember to always unsnap the tag before washing :) If not, no big deal, it's easy enough to make another one of these.

By the way, the picture is of Noob riding on a high-speed train from Shanghai to Beijing :)

IMG_1596

Overall, not my best work. You can't really tell from the pictures, but I had serious trouble sewing straight lines, for some reason! So there are a lot of places where the mat is kinda cockeyed. But it's definitely usable, and most importantly, Noob loves it. OK, he might not look like he's loving it in these action shots, but trust me, he was super excited about his new "choo-choos."

WP_001049

WP_001048

Sunday, November 13, 2011

Snow White costume

Yep, I'm still here.

I know I haven't posted in over a month. I've spent the last month 1) moving houses and 2) sewing Littles' Halloween costume. I think the first was more time consuming, but it's really a close call :)

Anyway, we're in the new house now, and good news! I now have a dedicated space for sewing :) (In the old house, my sewing area was in our guest room -- and we have guests frequently, so I had to take a sewing break or move my sewing stuff elsewhere on a regular basis. Not to mention the fact that guests had to find someplace to squeeze there stuff amidst all my fabric.) Bad news, I haven't had any time to set it up yet, so I'm still not sewing again. One of these days.

As for the Halloween costume, that did get finished, in time for the big day.

IMG_0795

For those of you who aren't intimately familiar with the Disney Princesses (lucky!), this is Snow White. The pattern is Simplicity 2817, which is the official licensed one. I made a size 5 for Littles, who normally wears a 4T, and it fits fine with some room to grow.

The fabric is all Symphony broadcloth from Joann's. This is the cheapest kind of broadcloth that Joann's carries, and if I were to do this again, I think I'd use the next "step up." The Symphony stuff really does feel kinda thin and cheap. Because it is, I guess :)

Despite using the cheapie broadcloth, all the fabric cost about $20, which is about as much as a ready-to-wear Snow White dress! But this does include some nice extras, like the cape. (Which Littles has started wearing independently of the Snow White dress -- for example, she'll put it over her Silvermist costume and call herself "Super Silvermist!") Besides, those stupid store-bought dresses always start falling apart within days. Even with the cheapie broadcloth, this one is holding up much better.

Good thing, because as I implied earlier, I'm not 100% sure which was more time consuming, moving houses or sewing this costume :) That's a bit of an exaggeration, but really, this did take a while to sew. It wasn't particularly hard, there are just a lot of pieces to cut out and put together. Still, I think the end result was worth it.

I followed the pattern pretty closely, except:

  • I used my serger on most seams, rather than my sewing machine. The pattern has a 5/8" seam allowance, so before sewing a seam, I'd draw a line 3/8" from the edge, and serge on that line. The serger adds another 1/4" seam allowance, so that's just right.
    There were only a few non-straight-line raw seams, mostly around the armholes. For those, I had to sew a basting line anyway to do the gathers, so I sewed the basting line at 3/8" in and then tried to serge along the basting line.
  • I skipped the collar. I worked on it one night and couldn't figure it out, and I had way too much other stuff going on in my life to spend a ton of time messing with it.
  • I used snaps, rather than velcro, to secure the cape to the dress (less likely to shift/come apart), and velcro, rather than a zipper, on the back opening (easier to get on/off independently).
  • I goofed initially, and sewed the skirt onto the bodice the wrong way! So the seam was on the outside of the dress. Oops. I had to cut it off and re-serge it. In the process, I think the bodice lost a little of its "definition" -- if you look at a picture of Snow White, the bodice dips down further/more sharply at the front waistline. Also, at certain angles, the piping doesn't seem to match up quite right with the dip in the bodice. I might try to fix it up a bit, but it does look OK as-is, for the most part.

Here are a few more shots...

The headband has been a big hit as well. I don't love it -- I put glue all along the top of the headband to secure the fabric, and you can see the glue line even now that it's dried. I should have just put glue on the bottom of the headband. But anyway, I guess the important thing is that Littles loves it so much that she wants to wear it to school practically every day. And I have a few more of these headbands (I could only find a 3-pack of suitably sized headbands) and plenty more fabric to use to cover them, and these are super easy to make!

IMG_0767

Another shot of the cape...

IMG_0804

With Noob... I wanted to make him a Dopey costume to match, but simply ran out of time. And this might be the last year I could coerce him into wearing a costume to match his big sister's. Oh well.

IMG_0762

So that's that! I'll see you again once my sewing room is set up :)

Monday, October 3, 2011

Halloween is right around the corner...

...which means I've been busy sewing! I'm working on Littles' Halloween costume, which is taking forevvvvvvver. So I've been taking breaks here and there to sew up some of the Halloween "Ooga Booga" fabric I got a while back.

Fitted:
IMG_9999

Pattern: Sprout Snap (one size)
Outer: Cotton interlock (KAM Snaps)
Hidden layer: Bamboo fleece (purchased through a coop)
Inner: Bamboo velour (Nature's Fabrics)
Soaker: snake style, 3 layers bamboo fleece, one layer bamboo velour. Intended to be folded in two to fit whatever rise setting the shell is on.

IMG_0001

This diaper turned out pretty small. Noob is still mostly in mediums, and on the medium rise setting in his one-size diapers, but he's on the large rise setting in this diaper and looks like he might outgrow it soon! So I would say this is a pretty small one-size. This pattern has a unique feature where you can snap the rise snaps into the waist snaps to create a "newborn" setting. It's teeny tiny!

IMG_9998

Action shot... Noob was not pleased to be my model :) He's not a fan of wearing diapers these days, at least not around the house.

IMG_0006IMG_0011

All-in-two (AI2):
IMG_0022

Pattern: Sprout Snap (one size)
Outer: Cotton interlock
Hidden layer: PUL (fabric.com)
Inner: Microfleece (wazoodle.com)
Soaker: Snake style, three layers bamboo fleece, one layer microfleece

IMG_0020

I wanted to try out an all-in-two style with a cotton outer layer. Supposedly, using a fabric like microfleece on the inner prevents moisture from getting through to the cotton outer, where it would wick. Unfortunately, the two times that Noob has worn this diaper, he has pooped within minutes of putting it on. So I haven't been able to see how it holds up to lots of moisture.

Action shots... sorry, the lighting wasn't the greatest on some of these:

IMG_0105IMG_0127

IMG_0122

I'm not sure I love this pattern. It seems a little baggy in the butt for Noob, and just fits oddly throughout. Hmmm.

Thursday, September 8, 2011

Chapel dress

I have been sewing lately, just working on a big order of diapers for my friend T, and waiting to post till I'm done with all of them. Almost there!

I took a break from that project a few nights ago to sew Littles' new chapel dress for school. As I've mentioned previously, these dresses cost about $50 if purchased in a store, so last fall, I got some fabric from Joann's to make one myself. They offered me the end of the bolt -- basically, if what you request to be cut leaves less than a yard or so on the bolt, the cutter will sometimes offer the remaining fabric to you at the remnant price (50% off the current price). The remaining fabric was nearly enough for another dress, so I got just a little bit more from a different bolt and figured I'd make another dress for her in the next size up.

I actually did all the cutting and everything last fall, and the cut fabric pieces have just been sitting around waiting to be sewn up. Of course, I waited till the night before the first chapel day to do it :) Luckily, it's an easy pattern that sews up quickly. I did find that the fabric frays very easily, so I ended up using my serger on a lot of it, to quickly finish the edges so they wouldn't fray. I love that thing!

Here's the end result. Simplicity 9854, in size 4 (the shirt is store bought):

d3 (2)

It's a little big, but that's perfect. The size 3 was a little big on her last fall, and by the end of the school year, it was baaaaaaaaarely big enough.

Wednesday, August 3, 2011

Rainbow dress

IMG_7539

I got the "tie dye" fabric that I used for the bottom part of this dress a few months ago, to top off a Fabric.com order so that I could get free shipping. I didn't even really know what I would use it for, but, well, it was cheap. And Fabric.com accidentally sent me two yards instead of one, and when I pointed this out to them, they said that I could keep the extra yard. (I highly recommend Fabric.com. Their customer service is excellent!) So, I have a lot of it...

Littles has been begging me to make a dress for her out of it since the moment she first saw it. She found it once again in my pile of fabric over the weekend, and begged me again. This time, with my experience making her tutu shirt fresh in my mind, I decided to tackle the project.

Believe it or not, the top part of the dress is one of my shirts. Ummm, no, it's not from my childhood... it's from my single-woman days :) In my defense, I did have to modify it so that it would fit Littles. I wasn't wearing a shirt small enough to fit a 4-year-old :) But yeah, it's a little too tight/skimpy for my current tastes, so it's been sitting in the back of my closet for years. Just waiting to be given a new life!

Here is what it looked like originally:

IMG_7487

I altered it by 1) cutting off the spaghetti straps and serging the ends together, 2) making the body of the shirt narrower by re-serging both sides, and 3) cutting a few inches off the bottom.

Then I cut the "tie dye" fabric to the appropriate length. It's not really tie dyed; it's a printed 100% polyester knit. Anyway, the tutorials I found suggested making the fabric about 2.5 to 3 times as wide as the shirt you're attaching it to. The fabric was 60" wide, so that was just about perfect for this shirt, which was about 22" at the waist after my modifications.

I serged the top of the fabric using a 2x differential on my serger, which gathered it slightly, and then I was able to pull the threads to gather it even more. I like this method of gathering much more than doing a basting stitch on my sewing machine. It's a little harder to gather, but it feels more secure. It's also at the very top of the fabric (since the serger cuts off any excess) so it's easier to hide with the seam attaching the top of the fabric to the waist of the shirt.

Once I had the fabric gathered, I serged the two ends together to form a "tube." Then I serged the gathered edge of the tube onto the bottom of the shirt. I used my experience with the tutu shirt to sew this one on right! Shirt right side out, skirt "tube" inside out, right sides together.

Finally, I finished the hem with a rolled-edge stitch on my serger. This made for a nice, lightweight hem that allows the dress to "splat out" (as Littles calls it) when she twirls. An important feature for any dress!

So, this was my first major project completed entirely using my new serger! It could definitely be done on a regular sewing machine, especially with knit fabric like I used, since it doesn't fray, so finishing the seams is less important. But serging gave me a nice professional finish on all the seams. I'm still getting used to my serger and definitely spent some time cussing at it during the completion of this dress :) But I really love the results!

And so does Littles:

IMG_7526

Sunday, July 24, 2011

Birthday gifts

On Saturday, we attended a joint birthday party for "J," age 3, and "D," age 1. Two different families, but we (along with many of the other invitees) are very close with both of them, so it was wonderful being able to celebrate together!

Both families also happen to have a place of significance in my sewing "life." I wanted to sew gifts for both boys to commemorate that.

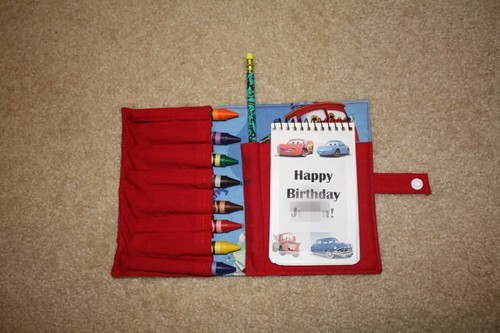
J's mom was the one who lent, and eventually sold, her sewing machine to me when I first got started. For J, I made a crayon wallet. I first heard of crayon wallets back in May, from one of my other friends, who had purchased some off Etsy for her kids and nieces. It seemed like the kind of thing that someone would write a tutorial for, and sure enough, some quick web searching turned up this tutorial.

It seemed a little tricky, but the blogger insisted over and over that it really wasn't that hard, so I took her word for it. Indeed, it really isn't hard at all! Once you get started, it quickly becomes clear how it all fits together.

I know that J loves anything with wheels, so I chose a Cars print for him. I actually got both types of fabric (the blue Cars fabric and the contrasting red fabric) at Walmart, of all places! My Walmart recently got rid of their bolts of fabric, but they do have an entire wall of precut 2 yard cotton pieces, including lots of Disney licensed stuff, for fairly reasonable prices ($6 for solids, $8 for licensed prints). I didn't have time to make it out to Joann's, so this worked out well.

The finished product:

IMG_7464

The outside, unfolded:

IMG_7466

Inside. The pad of paper is from Target, and then I taped on a cover that I made using Cars clip art that I found online:

I love how this turned out and will probably make more of these for future birthdays and other events.

On to D's gift. D's mom is a Texas A&M grad (yes, this is the same D for whom I made an A&M sleep sack as a Christmas present), and D is also the only other cloth diapered baby I know. Now, early last year, immediately following Noob's birth, I really wasn't doing a lot of sewing. I just wasn't into it, with everything else going on. But when D's baby shower rolled around, I decided to sew some A&M wetbags as a gift. That project is what really got me started on sewing again -- and I haven't stopped since :) I recently came across the leftover A&M fabric from the wetbags and decided to use it to sew -- what else? -- a diaper!

The fabric is cotton, so I didn't want to use it directly over a layer of PUL (to prevent wicking issues) and I also knew that D's parents don't use fitteds. I decided to try a pocket with embellished tabs, as I've heard that even cotton works fine on those tabs, since they don't really get wet.

I used the Darling Diapers Unlimited pattern, size medium. I've shown off embellished-tab diapers I've made using this pattern in the past, but here are some pictures for how I actually altered the pattern to do it. I took the idea from this Diaper Sewing Divas tutorial (free registration required), but that uses the La Di Da pattern. For DDU, I followed the same directions to cut off the wings at the line connecting the elastic endpoints (marked by stars):

IMG_7448

And I did the same for the wings:

IMG_7449

The LDD tutorial talks about trimming the little "tail" that you get when you put the tab pattern on top of the body pattern. For DDU, there are two little "tails" that need to be trimmed, one on top and one on the bottom. See them here?

IMG_7450

Final tab pattern with both tails trimmed:

IMG_7451

I traced the tab pattern onto vinyl. This allowed me to position the pattern just right on the fabric, because I could see through the pattern. Do you see the shiny vinyl on top in the picture below? The blue dots mark the snap placements (for both a single row and double row of snaps):

IMG_7452

Once I have the tabs cut out, I sew them to the body, then proceed with diaper construction as usual.

The final product:

IMG_7461

I didn't get the logos placed on the tabs quite as well as I would have liked, but I think it looks OK still!

IMG_7462

Inner is suedecloth with a modified welt pocket:

IMG_7460

Insert is a Zorb II trifold with serged edges:

IMG_7459

Folded up for stuffing into the pocket:

IMG_7458

I hope the recipients enjoy these gifts as much as I enjoyed making them!

Monday, July 4, 2011

Adventures of a rookie... serger?

My birthday was last week and my parents got me a serger! (A Brother 1034D, to be specific, which comes highly recommended at the lower end of the serger price range.) It's a fancy type of sewing machine that cuts, sews, and finishes edges, all in one step, so it can really make sewing a lot faster!

The timing could not have been better, as I need to make a bunch of inserts for Noob's Best Bottoms shells in preparation for an upcoming trip, and inserts are way faster to sew with a serger. As it turns out, inserts are also a perfect first serging project. They sew up quickly, so if you totally mess up, it's not like you've wasted a ton of time. You don't have to be super-precise about sewing the exact right shape; you just have to get in the ballpark. And since the Best Bottoms inserts have contoured edges, rather than being perfectly straight, it gave me some excellent practice sewing some (very gentle) curves, which is definitely tricky on a serger.

Bonus: They actually turned out usable. Here is the first batch I made.IMG_5970

They are five layers of flannel, which is not a whole lot. But I got this flannel for cheap, and it was great practice. Here is one of the inserts inside a Best Bottoms shell. I love how trim this system is. If you haven't seen it before, definitely check out this page, which explains what it's all about. It's pretty clever, easy to use and very economical.

IMG_5971

Then I moved on to using old t-shirts. Even cheaper! And I took pictures.

First, I folded the shirt into fourths. This gave me a total of eight layers:

IMG_5977

I laid an insert on the t-shirt, making sure that it wasn't covering the shoulder or neck seams. Then I traced it, using a disappearing ink marker so that I wouldn't ruin the original insert:

IMG_5978

When I was done tracing, I pushed down on the snaps on the insert. This left little indentations on the shirt, so I would know where to add snaps:

IMG_5979

I cut around the inset. This doesn't have to be precise, because as you'll see, the serger will take care of any excess. You can also see here that I've circled where the snaps need to go:

IMG_5980

I added the snaps, through the bottom two layers of the insert. I wanted to make this one into an "overnight" insert, which has snaps on the bottom (to snap into the shell) and on the top (to snap in a regular insert, giving double absorbency). So I flipped all the layers over and circled where the other snaps are:

IMG_5981

Then I added the snaps. I did sockets on one side (to allow the regular insert, which has studs, to snap in) and studs on the other side (to snap into the shell). Here are my layers with the snaps added... ready to serge!

IMG_5998

All done serging! Ready to use! You can see that the serger cut off all the excess fabric -- so easy! This took all of about 15 minutes from start to finish, including taking pictures :)

IMG_5999

Here's how it looks with the shell. Overnight insert (with snaps on both sides) on the bottom, regular insert on top. I made the regular insert out of a t-shirt as well and accidentally left a layer with some writing on it on top... oops! Still works fine, just looks funny :)

IMG_6001

IMG_6000

Here's how it looks on! Still pretty trim considering this is a full 12 layers of fabric.

IMG_6044

I love my new toy :) Hopefully by the time I'm done sewing all the inserts I need, I'll feel confident to try it out on some "real" projects!