Showing posts with label PUL. Show all posts

Saturday, November 3, 2012

Newborn prefolds and covers

The "trimmed" newborn prefolds I made worked out really well for Q's first few weeks. They didn't fit for long -- definitely not worth it to pay a lot for them if you're expecting a >8 lb baby -- but when they did fit, they just fit so perfectly! This is at about 6 weeks old/11 lbs, which is about when she outgrew them Snappi'd. (I do still use them as inserts in some of her pocket diapers!)

IMG_9397

Remember the teeny tiny Witteybums cover I sewed a while back? I was shocked that it actually did fit Q! It worked perfectly with a trifolded newborn prefold inside. So easy to just tuck the prefold under the flaps and fasten it on. This was at 4 days old/right around 9 lbs:

WP_001285

Unfortunately, I found that this combo didn't do a great job of containing breastfed baby poo, so I stopped using it after a couple of blowouts. I did use the cover as a swim diaper -- it can be tough to find swim diapers for really little ones, so this was a great option.

I found the snaps on the Witteybums to be tough to fasten on a bigger baby, so I sewed up an In A Snap cover in size newborn as well, with a velcro closure. The outer is a polyester knit and the inner is PUL. I believe this is over a Snappi'd newborn prefold. You can see the serging of the prefold peeking out through the umbilical scoop -- the scoop isn't really deep enough to make a big difference in keeping the cover off the cord stump, but it's just deep enough to make it tough to fit a prefold under it :( Aside from that, I liked this cover a lot, although again, it was so small that it was quickly outgrown and used as a swim diaper instead. She's about 2 weeks old/10 lbs here:

WP_001311

This is the newborn In A Snap cover that I sewed for another friend. Her baby ended up being almost 10.5 lbs at birth, so I figured there was no way this cover would fit. I had already sewed her an identical one in size small... but miraculously, she was able to get some use out of the newborn size cover, too. She was a few weeks old in this picture, not sure on weight, but obviously over 10 lbs :)

527092_10151041217693169_1351154621_n

This is an In A Snap cover in size small, at about 3.5 months/14 lbs. I like the fit of this cover a lot. It is trim, but with enough coverage that I can easily get a standard infant (green edge) prefold stuffed underneath it. This one also has a polyester knit outer/PUL inner:

WP_001754

Sunday, April 8, 2012

More baby gifts

Seriously, there will be a lot of these this year. Two of my close friends have already had babies, and there are three more due between now and September. Plus myself, of course!

One of the remaining three had her baby shower yesterday. She is the daughter of a good friend of ours, the kids' regular babysitter, and just an all-around awesome young lady, so I wanted to do something really nice for her. She decided to cloth diaper as well (seriously, I don't proselytize cloth diapering, but it's really cool that so many of my friends are coming to it on their own) and that made it easy! And since she's expecting a girl, this gave me a great excuse to use up a ton of girly PUL that I got on clearance from Fabric.com a while back. (If Q is a girl, I'm really going to have some fun :)

IMG_5194

Top row:
Rocket Bottoms In A Snap cover, size NB. Outer is Soft 'n Comfy fabric from Joann's. Inner is PUL from Fabric.com.
Rocket Bottoms pocket, step 1 (NB/small). Outer is PUL from Fabric.com. Inner is alova suedecloth from Joann's.

Bottom row:
Witteybums cover, size small. All PUL, purchased directly from another sewing mama.
Rainy Days fitted, step 1 (NB/small). Outer is french terry, hidden layer of bamboo fleece, inner layer of bamboo velour, soaker of bamboo fleece topped with bamboo velour. All purchased directly from other sewing mamas.

Behind: Wetbag, made with PUL from Fabric.com. I usually sew the zipper on top of these, but decided to try it on the side, like this video tutorial from Wazoodle shows. I love how it turned out!

How did they turn out? Well, I think the In A Snap cover is really tiny. It may fit for the first few weeks, but I'll likely make another one in size small. On the flip side, the Rainy Days fitted seems quite large. I made it with Lastin elastic -- it's a little trickier to work with than regular polybraid, because if you stretch it as tight as it will go, it will be way too tight. But I may not have stretched it enough on this diaper. I'll have to keep experimenting, because the nice thing about Lastin (as the name implies) is that it lasts a lot longer, rather than getting all stretched out like polybraid does over time. Anyway, that diaper should work fine, it may just be more of a small/medium than a newborn/small. The other two patterns, I already sewed up for one of my other friends, and they turned out well this time around, too.

Close-up of the "handmade" tag on the In A Snap cover. I really like these for adding a bit of a professional touch. They're also a handy spot to put size tags -- I don't always put size tags on stuff I sew for my kids, because I can remember what size things are, but for gifts for other people, I figure it might be helpful.

IMG_5195

Thursday, March 29, 2012

Newborn diapers and big sister gifts

One of my good friends just had her second baby a few weeks ago. She's cloth diapering, so I figured I'd try out some newborn diaper patterns!

If you're planning to sew newborn diapers, you must check out the Mama Kat Diapers blog. She reviews tons of newborn diaper patterns (including many free ones) and provides pictures and great information.

I knew my friend was planning to use prefolds and covers, so I wanted to sew a few more covers for her. The first one I made uses the Bramblestitches pattern, size newborn. Here is a link to the pattern, and here is a link to the magazine article explaining how to sew it.

The outer is a poly print, from the Top Shelf Fabrics destash.

IMG_4807

I used a "Handmade" tag with size tag on the back :)

IMG_4808

The inner is PUL. I chose to sew it with the fabric side facing out, to be softer on tender newborn skin, but you could also sew it with the shiny side facing out if you wanted it to be wipeable. I've done that before, on a cover I sewed for Noob, and had no irritation problems.

IMG_4809

Although this was newborn size, it turned out pretty big. I'd say it's more like a small size.

I think it would work well over a Snappi'd or pinned prefold. But I know many people like to just trifold prefolds and stick them in a cover. I didn't know which camp my friend is in, so I decided to sew her another cover that facilitated trifolding.

I settled on the Witteybums pattern. I forgot to post pictures of this, but I sewed up this pattern months ago for some diapers for Noob, and absolutely loved it. I did an all-in-two style diaper for Noob, but the pattern also has a neat option to make a cover with flaps to secure a trifolded prefold, very similar to a Flip cover.

I first made a newborn size cover. I knew from the diapers I sewed for Noob that this pattern has a very narrow crotch. Since it needs to fit over a prefold, I widened the crotch about 1/4", per the Mama Kat Diapers blog.

It turned out teeny tiny! Here it is next to a Proraps newborn cover. Noob was 8 lbs 11 oz at birth, and we used the Proraps covers for only about a week, until his umbilical cord fell off. Then we moved on to larger covers. The Witteybums newborn cover is even smaller than the Proraps! I'd say it's more like preemie size.

IMG_4813

I'm going to keep it and see if it fits Q at all, but I decided to sew a small size cover for my friend. This time, I widened the crotch by about 1/2". Here are the two completed covers.

IMG_4801

IMG_4804

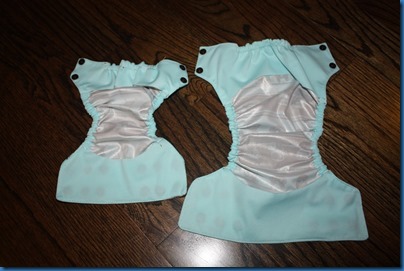
Insides of the covers. The outer is just a single layer of PUL, and then the flaps are PUL as well.
IMG_4805

Here's the small cover with a standard infant (green edge) prefold trifolded inside:

IMG_4806

Comparison shots of a Bummis Super Whisper Wrap size small (on the left) with the Bramblestitches NB cover (middle) and Witteybums small (right). The BSWW was one of my favorite covers for Noob. It fit him from when we stopped using the Proraps at 1 week old to a few months old. The Bramblestitches cover, in particular, has a very similar shape to the BSWW.

IMG_4815

Finally, I decided to make my friend one pocket diaper to try out. This is a Rocket Bottoms step 1 diaper. I really like the idea of two-step diapers like this, especially when I'm sewing my own. The "step 1" diaper has a snap-down rise, allowing you to adjust it to fit from roughly 7-21 pounds. So it's designed to fit newborns (unlike one-size diapers, which are typically too bulky), but you don't put a ton of work into a diaper that's going to be outgrown in a few short weeks. Then there's a "step 2" that fits from roughly 18-40 lbs, so it fits even longer than the typical one-size diaper.

IMG_4811

IMG_4812

This was my first time sewing with loop fabric. Rather than just putting a narrow strip of aplix or touchtape on the front of the diaper, I put a big panel of loop fabric. Supposedly, this gives more adustability, since the tabs can be attached anywhere on the panel.

This was also my first time sewing with pre-cut aplix tabs, rather than cutting my own tabs from a strip of aplix. Very handy and professional-looking.

IMG_4816

No pictures of the inner, but it's suedecloth (white butter suedecloth from Hancock's, my favorite!) with a modified welt pocket. For a soaker, I was hoping to use some of the Cotton Babies microfiber inserts that I have around the house, but they were just a little too wide. So I did three layers of heavy bamboo fleece, following the pattern included with the Rocket Bottoms pattern.

All three diapers together:

IMG_4819

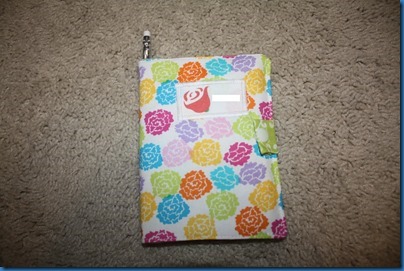
Of course, I couldn't forget the big sister! I made her a crayon wallet, with a personalized name tag on the front:
IMG_4823

I got the fabric a while back, on clearance at Walmart! They have some cut fat quarter bundles that include contrasting fabrics. Perfect for this crayon wallet, which calls for a contrasting fabric for the pockets on the inside.

IMG_4824

I goofed, and made the pockets for the crayons (on the left) too long. Weird, because I followed this tutorial exactly and it shows the shorter pockets, and when I made this for another friend a few months ago, I ended up with shorter crayon pockets. Oh well. It makes the wallet slightly harder to close properly, and it makes it harder to get the crayons out (you kinda have to push them out from the bottom of the pocket), but it works OK. One nice thing is that then the crayons don't "color" all over the rest of the interior of the crayon wallet.

This was all lots of fun to sew and I love how everything turned out!

Thursday, February 23, 2012

The final stash of stupid cloth training pants (now even stupider, thanks to Noob!)

I finally finished the last two a few days ago. Here's all of them (minus one, the white one with the stars on the tabs, shown in this post -- it was still at school):

IMG_4461

Closer up... the one on the left here is one of the two new ones, and the one on the right I made a few weeks ago. Same PUL -- you can see how it's faded with washing in the one on the right. But it doesn't look too bad when it's not side-by-side with a brand-new one :) These both have microchamois tabs and microfleece inners.

IMG_4463

The one on the right here is another new one. "Later Gator" PUL print body, ribbed knit tabs (from Joann's), microfleece inner:

IMG_4465

The one on the right here is the second one I sewed, but I never posted a picture of it. It's the one with crushed panne tabs/inner, before I decided crushed panne was too much of a PITA to work with :)

IMG_4466

I've posted all of these before, but just to do close-ups...

IMG_4464

IMG_4467

IMG_4468

IMG_4470

IMG_4471

So of course, now that I'm done sewing these, Noob has stayed completely dry at school for much of this week! LOL! That is why I didn't buy these suckers at retail prices! I'll keep some around for naps/nighttime, for sure, and I'm just trying to decide if I should save the rest for Q (since it's a pretty boyish stash, and Q may or may not be a boy) or sell them off...

Wednesday, February 8, 2012

More stupid cloth training pants :)

(See previous post for more information about these, including why I think they're stupid and why I'm sewing them anyway :)

IMG_3883

On the left:
Outer: PUL (wazoodle.com)
Tabs: camouflage polyester knit (fabric.com)
Inner: microchamois (purchased from a coop)

On the right:
Outer: PUL (purchased directly from another sewing mom)
Tabs: cotton rib knit (Joann's remnant bin)
Inner: microfleece (wazoodle.com)

Some action shots of the one on the right, which is one of my very favorites (love that shark print PUL!) and whoa, some serious bedhead:

IMG_3885IMG_3887

A few more...

IMG_4130

Left:
Outer: PUL (purchased directly from another sewing mom) -- this is a "happy tools" print that I've seen in a number of places, and I will note that it has faded slightly
Tabs: microchamois (purchased from a coop)
Inner: microfleece (wazoodle.com)

Middle:
Outer: PUL (purchased directly from another sewing mom)
Tabs: Cotton rib knit (Joann's remnant bin)
Inner: microfleece (wazoodle.com)

Right:
Outer: PUL (purchased from the Swaddlebees outlet -- not available anymore)
Tabs: Cotton rib knit (Joann's remnant bin)
Inner: microfleece (wazoodle.com)

For the inserts, I did three layers of heavy bamboo fleece (purchased from a coop) again, but this time, I busted out some "fancy" multicolored serger thread. This is Gutermann brand bulky nylon, readily available at Joann's, and it looks awesome! I love it. It makes the inserts really easy to pick out in the dryer, too -- handy when I'm in a rush to get the diapers stuffed and ready for school in the morning. You only really need the fancy thread in the upper and lower looper; I used plain white thread for the left and right needle.

IMG_3882

Noob has been at school for two weeks now and these are working out well. The fit seems to be decent, as I've been home for five of the days he's been in school (I was out of town on business all last week) and he's only leaked one of those days. And that was actually because the insert was soaked, not due to fit. But I don't think that will be too much of an issue, as a single insert does seem to be plenty of absorbency for him as long as his teachers stay on top of diaper changes. Most of the time, he soaks less than half of the insert. (I can tell when I go to unstuff the trainers at night.)

I'm now up to 10 trainers, which is baaaaaaaaaarely enough for two full days -- he's there between 8-9 hours/day, and I typically send him over in one pair of training pants and then he gets 3-4 diaper changes during the day. I have two trainers more cut out and ready to sew, which should give me a little more breathing room in case he has an extra-poopy day or something.

Monday, January 23, 2012

Cloth training pants

Let me preface this post by stating that I think that training pants (cloth or disposable pull-ups) are the stupidest thing ever. LOL.

The idea behind them is that they provide a transition from diapers to underwear, allowing kids to use the potty but preventing messes when they don't. Which sounds great in theory. Problem is, at least with my kids, avoiding a mess is the reason that they use the potty. If they're in training pants, there's no motivation to use the potty. And so training pants are really no better than diapers.

For that reason, Littles went straight from diapers to underwear. And for that reason, when I work on potty training with Noob right now, he's bottomless.

Another thing that's stupid about cloth training pants in particular is that they are designed to be used for a limited period of time, when the child is transitioning from diapers to underwear. Presumably, the child should either "get" the concept of using the potty and transition to underwear, or not "get" it and go back to diapers. Either way, that eliminates the need for training pants. I can see how it might make sense to use a pack or two of disposable pullups during that transition period. But spending hundreds of dollars on a full stash of cloth training pants? That makes no sense to me.

So, why on earth am I sewing a full stash of cloth training pants? Well, Noob is starting at preschool this week, and his preschool requires pullups -- no diapers. So, I have to buy super-expensive disposable pullups, or spend hundreds of dollars on cloth training pants... or sew my own. Clearly, the last option won out :)

(If you're wondering what I did for Littles when she started at this preschool? Since I didn't know how to sew at the time, I found some cheap side-snapping diapers, and pre-snapped them so that they could be pulled on. After a few months, her teachers complained that she wasn't able to pull them up/down easily enough. Which was true. Luckily, she was on the verge of potty training anyway, so we switched her into underwear at that point and that was that. But given that Noob will have the same lead teacher, I knew that the side-snapping diapers wouldn't be an option this time around.)

Without further ado/ranting, here is my collection of stupid cloth training pants :) All are done using the Trimsies Trainer pattern, overnight style, size small, with a pocket.

IMG_1652

IMG_1654

IMG_1655

Outer: PUL (purchased directly from another sewing mom)
Tabs: Cotton rib knit (Joann's)
Inner: Microfleece (wazoodle.com)

I did just a slit pocket on this one. Very easy -- basically, I cut a hole in the inner fabric using my rotary cutter, before sewing the outer and inner together. But I don't like the way it looks. It kinda "flips up," exposing the Lastin elastic at the back. Still, it's very serviceable.

Noob wasn't really cooperating for action shots, but here are a few. For these, I was using a two-layer Zorb II soaker that I made a while back. It fit OK, but these trainers are really trim through the crotch/front panel, so I knew they'd look better if I sewed up some soakers from the pattern itself. Which I've done now... I'll get to those in a little bit. Anyway, you'll see a little bit of poofiness in the front because the soaker that's in there isn't the best fit.

IMG_1640IMG_1631

I wasn't quite sure that the side tabs were stretchy enough to be easy to pull up/down, and I thought it might be the microfleece inner limiting the stretch. So for the second pair I made, I used crushed panne velour for both the inner and the tabs, since it's super thin and stretchy. No pictures of this one, unfortunately :(

I found that the final product was just about as stretchy as my first version. And crushed panne is a maaaaaaaaajor pain in the butt to work with, because it's so thin and stretchy and slippery. It took me a lot longer to make, and since I have a lot of these to sew up in a short period of time, I decided to go back to microfleece inners.

Here are the next three that I made:

WP_000987

Inserts: These are made from the soaker pattern included with the trainer pattern. They fit great! They are three layers of heavy bamboo fleece (purchased from a coop). I originally thought I'd double them up, but I'm finding that just one is plenty absorbent! I'm loving this heavy bamboo fleece!

Top trainer outer: PUL (purchased from another sewing mom)
Tabs: Jersey cotton (from an old sheet set we have around the house, same one I used for the fitted diaper in this post)
Inner: Microfleece (wazoodle.com)

Middle trainer outer: PUL (fabric.com)
Tabs: Cotton interlock (naturesfabrics.com)
Inner: Microfleece (wazoodle.com)

Bottom trainer outer: PUL (purchased from another sewing mom)
Tabs and inner: Microchamois (purchased from a coop)

These all turned out really really well! We've been on vacation in China for the last ~2.5 weeks (which is why I haven't been sewing...) and I've used them all quite a bit and they've been working great. I especially love the bottom one with the microchamois tabs/inner -- microchamois is a type of microfleece that is slightly thinner and stretchier, and it really makes for a nice fit.

Oh! One thing I did on some of these trainers was sew a small patch of t-shirt fabric into the crotch. This is a feel-wet fabric (microfleece/microchamois are stay-dry), so hopefully that will help Noob with potty training. Here's what it looks like. Not real pretty on this trainer (it's obviously less visible on the trainers with white inners), but you can't see it once the trainer is on.

WP_000988

No action shots because I've been lazy, but I'm really happy with this pattern and these trainers. I have six now, which should be enough for one day at preschool... I'll be doing a lot of laundry at night until I can sew up a few more to add to the stash!

Saturday, September 24, 2011

Have I not posted about these diapers yet?

We're on vacation, so I'm not sewing this week. I am, however, putting up tons of vacation pictures on my personal blog. And I noticed that my "Sewing" folder had some pictures that I don't think I've put up here yet.

So, here are some more diapers. Apologies if any of these are a repeat!

Pattern: Darling Diapers Unlimited, size medium
Outer: T-rex polyester knit print, from the Top Shelf Fabrics destash
Hidden layer: PUL
Inner: Alova suedecloth from Joann's, modified welt pocket
Closure: Snaps. I was running low on black snaps, so I did sockets on the wings and studs on the body -- usually, you do the opposite. But it works fine this way, too!

Front:

IMG_8369

Back:

IMG_8370

Inside:

IMG_8371

I made this diaper mostly to see whether doing a poly print outer/hidden PUL layer would work OK, without any Chelory Method type stuff. And... it does!

One other thing I learned with this diaper is that when sewing with a hidden PUL layer, it's good to use microfleece for the inner. This diaper is kinda hard to stuff, and I think it's because the outer is a tiny bit thicker and less stretchy (with the two layers of fabric), and then the suedecloth doesn't stretch at all. My Cowboys diaper is also a tiny bit harder to stuff than my other diapers, but it's easier than this one, and I think that's because the microfleece inner helps a lot.

The other thing that doesn't help with the stuffing issue is that with suedecloth, I like to turn the edges of the modified welt pocket opening under slightly. (Microfleece is a little too thick to do that with.) That cuts down slightly on the total width of the pocket opening. After doing this diaper, I started adding an extra inch to the pocket opening when doing a suedecloth inner, and that does help a lot with stuffability.

Anyway, once I get this diaper stuffed and onto Noob, I love it. So cute!

IMG_8373IMG_8376

IMG_8387

Next up... pattern: Darling Diapers Unlimited, size medium
Outer: Winter Giraffes printed PUL, purchased directly from another sewer
Inner: Periwinkle microfleece from Wazoodle. I'm curious to see how this holds up. The white microfleece I've been using (from the Swaddlebees Clearance section) gets pilly and dirty, fairly quickly.
Closure: Tabs are aplix hook. Front strip and laundry tabs are touchtape loop. Both from Wazoodle. I love this combination! I've always found aplix to be not quite sticky enough, and touchtape to be too sticky, so I like using hook of one and loop of another.

IMG_8436

IMG_8437

I used DiaperMaker elastic from Wazoodle for the first time on this diaper. (I normally use regular ol' Dritz elastic, which I buy in bulk by the yard at Joann's.) I didn't like it at first. It didn't seem to be very strong. In these pictures, taken right after I sewed the diaper, the rise on the diaper seemed to be much higher than usual, as if the elastic wasn't strong enough to gather the diaper enough.

IMG_8453IMG_8461

But I think the elastic shrunk slightly when I washed it, and now, it fits just like my other diapers that use this pattern. I'm actually starting to prefer the softer touch of this elastic. It seems less harsh/less likely to cause red marks on Noob's thighs. I haven't sewed any new diapers for Noob in a few weeks, but I do plan to try this elastic again when I do.

IMG_8463

Finally, probably the ugliest diaper I've ever sewn :)

IMG_9652

Pattern: Very Baby Basic AIO, size medium/long
Outer: woven cotton print (Joann's remnants bin)
Hidden layer: Zorb II (Wazoodle)
Inner: minky (Soft n Comfy fabric from Joann's remnants bin)
Soaker: trifold with one layer minky/one layer Zorb II

IMG_9649

I actually started this as a Fourth of July diaper. I was putting the finishing touches on the soaker when I ran out of thread on my serger. Now, this was right after I got the serger... and it took me until well after the Fourth of July to figure out how to re-thread it :) Haha! In my defense, the serger does have four separate threads that need to be threaded, and one of them has eleven steps to thread it! The serger I have does make it as easy as possible, but it's still not easy, especially the first time.

Anyway, I eventually figured it out and finished the diaper. (And now threading my serger really is easy!) But, it turns out that Zorb II doesn't work well as a hidden layer for a fitted. It is really thick, making the diaper bulky, and also, the elastic isn't strong enough to gather it well. So, this diaper is huge, and the inner minky rolls out at the legs and looks funny.

IMG_8466IMG_8469

That said... I actually love this diaper. The Zorb II might make the diaper ugly, but it also makes it super absorbent. I use it regularly overnight, and it still has dry spots in the morning. Also, I've always had recurring ammonia issues in overnight diapers... not this one. Zorb II seems to be much less prone to stink. I usually alternate overnights between this diaper and the camo Rainy Days diaper, so they get used equally often -- well, I've already had to strip the camo diaper because it was getting ammonia-stinky. This diaper has never even had a hint of stink.

So, now I'm trying to figure out a way to make an overnight-worthy fitted exclusively out of Zorb II, since clearly, elastic doesn't work too well with it.. I have some ideas. Stay tuned :)