Showing posts with label zipper. Show all posts

Sunday, April 8, 2012

More baby gifts

Seriously, there will be a lot of these this year. Two of my close friends have already had babies, and there are three more due between now and September. Plus myself, of course!

One of the remaining three had her baby shower yesterday. She is the daughter of a good friend of ours, the kids' regular babysitter, and just an all-around awesome young lady, so I wanted to do something really nice for her. She decided to cloth diaper as well (seriously, I don't proselytize cloth diapering, but it's really cool that so many of my friends are coming to it on their own) and that made it easy! And since she's expecting a girl, this gave me a great excuse to use up a ton of girly PUL that I got on clearance from Fabric.com a while back. (If Q is a girl, I'm really going to have some fun :)

IMG_5194

Top row:
Rocket Bottoms In A Snap cover, size NB. Outer is Soft 'n Comfy fabric from Joann's. Inner is PUL from Fabric.com.
Rocket Bottoms pocket, step 1 (NB/small). Outer is PUL from Fabric.com. Inner is alova suedecloth from Joann's.

Bottom row:
Witteybums cover, size small. All PUL, purchased directly from another sewing mama.
Rainy Days fitted, step 1 (NB/small). Outer is french terry, hidden layer of bamboo fleece, inner layer of bamboo velour, soaker of bamboo fleece topped with bamboo velour. All purchased directly from other sewing mamas.

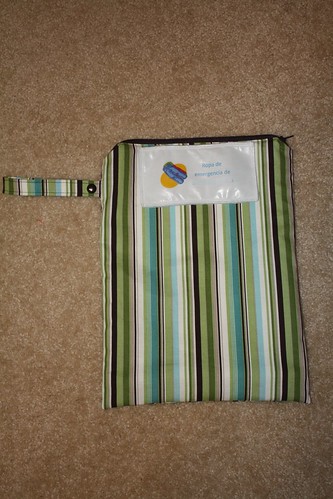
Behind: Wetbag, made with PUL from Fabric.com. I usually sew the zipper on top of these, but decided to try it on the side, like this video tutorial from Wazoodle shows. I love how it turned out!

How did they turn out? Well, I think the In A Snap cover is really tiny. It may fit for the first few weeks, but I'll likely make another one in size small. On the flip side, the Rainy Days fitted seems quite large. I made it with Lastin elastic -- it's a little trickier to work with than regular polybraid, because if you stretch it as tight as it will go, it will be way too tight. But I may not have stretched it enough on this diaper. I'll have to keep experimenting, because the nice thing about Lastin (as the name implies) is that it lasts a lot longer, rather than getting all stretched out like polybraid does over time. Anyway, that diaper should work fine, it may just be more of a small/medium than a newborn/small. The other two patterns, I already sewed up for one of my other friends, and they turned out well this time around, too.

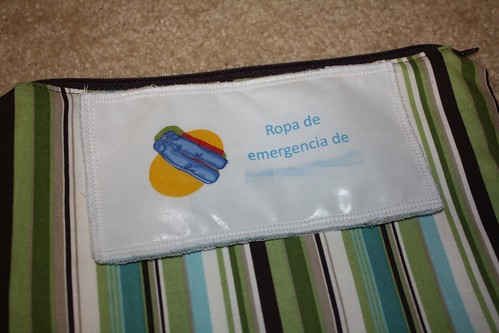
Close-up of the "handmade" tag on the In A Snap cover. I really like these for adding a bit of a professional touch. They're also a handy spot to put size tags -- I don't always put size tags on stuff I sew for my kids, because I can remember what size things are, but for gifts for other people, I figure it might be helpful.

IMG_5195

Tuesday, September 20, 2011

More wetbags

I made these for my friend C. Her son recently started preschool, so she wanted a bag that she could put his spare clothes in, and that his teachers could send any soiled clothes home in.

IMG_8698

This is my standard wetbag with a woven cotton outer (from Joann's), PUL inner (still working through that white PUL I got directly from another sewer), and zipper (from my eBay zipper stash).

I added a snap-on name tag. C's son is going to a Spanish immersion preschool, so it's in Spanish. It says "Ropa de emergencia de J______ R_______." Translation: "J_____ R______'s emergency clothes."

IMG_8699

I spent way too long on the darn name tag, but once I figured it out, it was very simple. I designed the graphics/text in Microsoft Publisher and printed it on t-shirt transfer paper. I transferred it to a piece of white broadcloth. Then I took a piece of flannel, reinforced it with interfacing, and added snaps. Finally, I serged together the broadcloth, the flannel, and an extra layer of flannel in between (so that the snap caps wouldn't be visible through the broadcloth).

The reason it took so long was that I kept trying to make the tag almost the same size as the snaps. (There are four of them, in a rectangular shape.) Then I wasn't able to sew or serge, because my presser foot kept hitting the snaps. Finally, I just made the darn thing huge, which gave me plenty of room to work with when sewing it all together.

I made another, larger wetbag for C, to put wet clothes/towels in at the pool:

IMG_8700

Again, it's a woven cotton outer (from WalMart), PUL inner (same white PUL), zipper (from my eBay zipper stash). Close up of the print and the zipper:

IMG_8701

Thursday, August 25, 2011

An old project that came home

I mentioned in a previous post that I got back into sewing early last year, when I decided to make a Texas A&M wetbag for one of my Aggie friends who was expecting a baby and planning to cloth diaper. We happened to go to brunch the other day with that friend, and forgot Noob's diaper bag! She was kind enough to lend us a diaper... along with one of the wetbags I made :) So, I was able to snap a picture:

IMG_8473

I was pretty proud of this project, especially at the time (it was one of the first wetbags I made!), and it looks like it's held up well over the last year or so.

Monday, August 8, 2011

Large wetbag

Noob's babysitter also watches a little girl, who is 5 days older than Noob. Her mom recently switched to cloth diapers and offered to pay me to sew a large wetbag for her. I used up a bunch of the leftover red cotton fabric from J's crayon wallet for the outside, and some of that big order of girly PUL that I did for the inside. I think it turned out really cute!

IMG_7961

Tuesday, July 19, 2011

Still more baby gifts

4f (2)

As I mentioned previously, I had an insane number of friends expecting babies. I think there have been four new arrivals just since the beginning of June! Now I have a few months off before another mini-boom coming in December/January...

Anyway, I've been working on the stuff above for quite a while, and finally got around to finishing it up. It's for Hubby's friend D and his wife, who just welcomed their first baby, a little girl. D's wife went to Oklahoma University (OU), hence the fabric choice :)

Nothing super exciting here, all stuff I've done before...

  • Sleep sack: McCall's 4236, size medium
  • Pants: Simplicity 2291, size small
  • Onesie: From the Babies R Us clearance back in March, with one of the fleece squares sewn onto it.

Yes, it felt pretty funny sewing a bunch of fleece with temperatures well over 100 degrees these days, but that's why I made everything in 6-12 month size!

Monday, July 18, 2011

Kitchen laundry bag

About two years ago, we switched over to using mostly washcloths to clean up spills, hands/faces, etc. around the kitchen. It really cut down on our paper towel usage, and washcloths are so much sturdier for cleaning up the big messes that kids tend to make!

I had been putting the dirty washcloths, along with bibs, dish towels, and other kitchen "laundry," in our regular laundry hamper. But this hasn't been working well. For starters, a lot of kitchen laundry is covered in food, so it attracts ants in our laundry hamper -- gross! Also, a lot of it is wet, so it starts to get stinky after a few days -- again, gross! And when it comes time to wash it, because it's stinky, I prefer to use Tide on it -- I feel like it cleans better than Country Save, which is what I usually use on our clothes. Unfortunately, Noob breaks out in a rash if he wears clothes washed in Tide, so I usually end up washing everything in Country Save, rather than having to pick wet, stinky, food-covered washcloths out of the hamper to launder separately.

I finally got tired of this and decided to make a wetbag just for our kitchen laundry:

4e (2)

Sorry, that's not the greatest picture, but nothing super exciting here. I made this in the same way I make wetbags for use with cloth diapers, following this tutorial. I used a food-themed woven cotton print (from the remnants bin at Joann's) for the outer and white PUL for the inner. The zipper is from my eBay zipper stash. I made the handle snapping so that it could hang from a doorknob or snap around the handle of the oven, refrigerator, etc.

Simple, easy, and very effective! I've been using it all day today and I love it already. It should do a much better job of keeping the stink contained and the ants away!

Friday, June 24, 2011

Wetbags: Always fun to sew out of stash!

My friend T, who I made the wet/dry bags for a few months ago, contacted me last week to see if I could make some wetbags for a family member who is expecting soon and planning to cloth diaper. There was one small catch: The baby shower was coming up soon and so she needed me to ship the finished bags by Saturday. I agreed, with one small caveat: I had to be able to make the bags with what I had at home already in my stash. Hubby was traveling on business last week and I knew I wouldn't have time to hit up a fabric store to buy any additional supplies.

Luckily, I just got some cute printed PUL, including that Later Gator print that I used on those pocket diapers I showed in my last post. T really liked a print called "Winter Giraffes." I went through my massive eBay zipper stash and found some dark brown zippers that were the appropriate length and matched the print well.

The result... two large wetbags and a smaller bag for wipes:

IMG_5449

I sewed these in a similar way to the "quick and dirty" wetbags that I did previously, but with a few small tweaks.

For starters, I added handles. For the two larger bags, I did a layer of PUL and a layer of white suedecloth for the handles. I don't love how they turned out, because the suedecloth does peek through a bit at the edges of the handle. For future reference, handles should always be entirely the same material.

Anyway, here is a shot of the handle when I was sewing. This was when I made the first seam, with wrong sides together. I made sure that the handle was pointing to the outside (i.e. in the same position it would be on the finished bag). I then sewed the seam and sewed back and forth a few times across the handle to reinforce it. Hard to see in the thumbnail, but you should be able to see it if you click to enlarge:

IMG_5436

Then I turned the bag inside out (right sides together) and sewed the second seam. The end of the handle ended up peeking through into the inside of the bag. I trimmed it down so that it was fairly flush with that second seam. Since the end of the handle is visible, it's important to either finish that end or use fabric that doesn't fray. Also, I think it's good to use 100% polyester fabric; cotton fabric might wick moisture from inside the bag to the outside of the handle.

I also sewed the zippers a bit differently. On the PUL-only wetbag I did previously, the raw ends of the zippers were still visible. This time, rather than trimming down the zipper to be the same width as the wetbag, I left a little bit of a tail on the zipper. When sewing the second set of side seams, I made them wide enough at the top (about 5/8") to encase those zipper tails -- so the tails ended up in between the first and second side seams, just like the raw edges of the sides of the PUL. Then, once I was past the zipper tail, I slowly decreased the seam allowance until it was about 1/4". The result isn't super noticeable from the outside of the bag, and I think it makes the zipper ends look much more finished and professional:

IMG_5441

Finally, I figured out a little sewing technique that made sewing these easier. I've always had trouble when sewing wetbags because the PUL tends to stretch/slide as I sew down the zipper. In the past, I've been able to compensate enough to make that seam work in spite of the stretching/sliding, but when I sewed the first of these bags, I was having an awful time with that darn zipper. Teflon foot, zipper foot, didn't matter. Finally, I flipped the fabric over, so that the zipper was on top and the PUL was on the bottom, shiny side down, and I sewed with a regular ol' zig zag foot (straight stitch, though). This worked really well! Hardly any stretching/sliding! I'm not sure why I've always sewn with the PUL on top, but I'm definitely going to try PUL on bottom again if I do another wetbag!

Hopefully all that makes sense. These did take a little longer than I expected because of figuring out some of these tweaks, but they were still reasonably quick to sew up. I did get them done and off to T on Saturday!

And I still have a diaper cut left of that Winter Giraffes fabric to make a diaper for Noob :)

Saturday, April 9, 2011

Quick and dirty wetbag revisited

I posted previously about a "quick and dirty" wetbag that I sewed using sandwich PUL from the Swaddlebees clearance section. After sewing that bag, I had about half of that end cut left -- plenty to sew up one more! And you can never have too many wetbags... I use them not just for cloth diapers but also for storing pump parts in my pump bag, for bringing wet swimsuits home from the pool, etc. They are super handy!

This time around, I took pictures as I sewed up the bag.

I started by cutting a rectangle of PUL. I think mine was about 12" by 25", but it doesn't really matter -- you can make any size you want/need.

IMG_2473

I put the zipper down with the teeth facing up. I put one short end of the fabric on the zipper, right side down, lining up the top edge of the fabric with the top edge of the zipper tape.

IMG_2474

I sewed a seam down the length of the zipper tape, then flipped the fabric over along that seam:

IMG_2475

I topstitched down the length of the zipper tape.

Then I folded the fabric right side to right side and lined up the other short end of the fabric with the top of the other side of the zipper tape:

IMG_2661

Again, I sewed a seam down the length of the zipper tape. Then I flipped the fabric right side out:

IMG_2662

And topstitched down the length of the seam again.

Now, with my last bag, I flipped the bag inside out, sewed a seam down each side, and called it a day. But this left raw edges and the zipper tails visible inside the bag -- not the end of the world, but not the prettiest design, either. So this time around, I took a slightly different approach.

I left the bag right side out and pinned down the two side seams. I made sure to unzip the zipper most of the way before doing this. Otherwise I would have sewed my zipper on the outside of the bag :)

IMG_2664

I trimmed down the seam allowances to about 1/8", ncluding trimming the zipper tape on both sides so that I no longer had those long tails:

IMG_2665

Then I flipped the bag inside out (through that partially unzipped zipper) and sewed down both edges with a 3/8" seam allowance. Done!

Here is a shot of the inside of the bag before turning it right side out. No expose seams... yay!

IMG_2666

View of the outside:

IMG_2669

The raw edge of the zipper tape is neatly sewed into the seam on this side:

IMG_2668

But it's visible on this side :( Not sure what else I could to do hide it... it's not too bad anyway:

IMG_2667

Easiest wetbag ever! I think it may have taken longer to write this post than to sew this wetbag :)

Diapers, again

When I bought the PUL to make T's wet/dry bags, I accidentally ordered two yards, when I only needed less than one yard. So I have a ton of leftover aqua PUL, and I figured it was time to turn it into some diapers. Round one...

IMG_2463

Outer is PUL from fabric.com, inner is butter suedecloth from Hancock Fabrics. The pattern is Darling Diapers Unlimited. Last time I sewed this pattern, the pocket that I made was too narrow for easy stuffing. Luckily, the pattern has an option for a slightly wider diaper (you cut the pattern with color sides -- if you've ever seen the pattern before, this will make sense!), so that's what I did this time and it worked out beautifully.

The hook & loop is aplix from Verybaby.com. I ordered some aplix and touchtape from them a while ago, and used the touchtape first. I haven't been impressed... the loop side is super sticky, to the point where it is hard to actually get the hook unhooked. Also, the selvages have tended to unravel on the diapers I've made so far. I finally ran out of it and switched to the aplix for this diaper, and oh my goodness! So much better. It is soft and not too sticky. Love it.

On the bum...

IMG_2469

IMG_2470

It is a little bit "bubbly" in the back, and I'm not quite sure why. It's not too too bad, but not as trim fitting as the Bum Genius pockets that we usually use.

IMG_2471

After I finished that one, I pulled out some sandwich PUL that I bought from the Swaddlebees clearance section last summer. They had a bunch of discontinued PUL, including prints, which are very hard to find! And it was selling for basically wholesale pricing, $6/yard. (They still have some left at that price, but all solids, no more prints.) I got that and some microfleece for diaper inners and also some wool. But they told me that they had oversold the PUL, so I cancelled the entire order, figuring microfleece was no good without the PUL and, well, I didn't really need the wool. They came back and said, "Can we substitute a different print for you?" So rather than the discontinued "Blue Martini" print, they sent me the current "Blue Summer" print. And as I mentioned in a previous post, they threw in an end cut of "Blue Martini," which I've been using to make wetbags. Big score!

Anyway, here's what I sewed up. Same pattern and suedecloth inner as the previous diaper:

IMG_2519

The pattern calls for sewing a small strip of lining fabric at the back to create the casing for the back elastic. I made it a little bit wider than the pattern called for (2" wide instead of 1.25") and added a snap socket:

IMG_2520

Now I can either stuff the diaper's pocket or snap in a soaker to use it as an AI2, just like my Softbums Omni. Here it is with a snapped-in soaker. This is the "fake pod" that I made for my Omni a week or so ago.

IMG_2521

On the bum... excuse the runny nose. He is teething:

IMG_2579

IMG_2581

IMG_2580

I've always found sewing diapers to be a little tricky -- the elastic, in particular, gives me fits -- which is why I don't do it a ton. But doing two back-to-back seems to have helped, as the second diaper came together a lot faster than the first. I'm about to go on a one-week business trip and won't be able to sew, but I have some more diaper ideas when I get back, so I think I may knuckle down and churn them out!

Saturday, April 2, 2011

Quick and dirty diapering projects

The kids and I were out late tonight watching Hubby play hockey, so once I finally got them to bed, I didn't have a ton of time to sew. So I just worked on some easy diapering items.


First up was a new wetbag. I only have two medium-size ones (holding about 3-4 diapers) for use in the diaper bag, and it never seems to be enough, so I've been wanting to make some more. For the body of the bag, I used some sandwich PUL from the Swaddlebees clearance area. I had ordered a yard of this PUL to make diapers, and they threw in an end cut of a slightly different print for free. It's only about 14" wide, not enough to make a diaper, but perfect for a wetbag. And since it has a cute print, I could just do a simple single-layer wetbag, rather than doing an inner PUL layer/outer print layer like I usually do.


IMG_2091


I got the zipper from my new zipper stash :) Since I've been sewing a lot of wet/dry bags, sleep sacks, etc., I keep having to buy zippers, at $2 apiece or more. The zippers sometimes cost more than the fabric! That was starting to annoy me, so I went on eBay and bought a lot of 100 zippers for $27, including shipping! All different colors and lengths. Obviously a lot cheaper, even if I don't end up using every one of them. Plus, it's nice just having them there for when I feel like sewing something with a zipper!


IMG_2091


Anyway. The sewing was super easy. I just sewed in the zipper (using a method similar to the wetbag tutorial I always use, except with just one layer) and then sewed down the two sides. Done!


The bag is a little ugly on the inside, as you can see raw seams and the tails of the zipper tape. (Normally, all that stuff is hidden in between the inner and outer layers of the wetbag.) But it's functional, and the price is right!


IMG_2095


Once I finished that up, I worked on a "fake pod" for my Softbums Omni diaper. The Omni is pretty nifty... truly one-size (by means of a unique toggle elastic system), and it can work as either a pocket diaper (by inserting the "pod," or insert, into the pocket in the diaper) or as an all-in-two (by snapping the pod into the body of the diaper). I only have one shell and one pod, so I'm not really able to use it as an all-in-two right now -- I can't use the shell more than once. But I figured it wouldn't be too hard to sew my own pods.


I got some bamboo velour and bamboo fleece from Nature's Fabrics, and prepped it by washing it on hot 4-5 times. (I just threw it in with my whites whenever I did a load.) Real pods are 3 layers of bamboo fleece and one layer of bamboo velour, but that makes it really thick and Noob doesn't need all that absorbency, so I decided to use just two layers of bamboo fleece. I traced the shape of the original pod onto the fabric, then cut around it with a generous seam allowance.


I layered the fabric as follows: bamboo velour right side up, first layer of bamboo fleece right side down, second layer of bamboo fleece (doesn't matter what side is up). Then I sewed on the tracing line, turned the new pod, and topstitched all around. Finally, I added a snap socket at the top of the new pod, for snapping in to the Omni shell when using it as an all-in-two.


The result is an almost perfect copy of the original pod. In this picture, the original pod is on the left, and my copy is on the right:


IMG_2089


It fits nicely in the Omni shell:


IMG_2090


I'll try it out tomorrow and see how it performs!

Tuesday, March 29, 2011

Yes, even more baby gifts!

Hubby knows about as many people having babies as I do. One of his co-workers has a newborn at home, and his boss's wife is due any day. They both live in Boise and are big Boise State fans, so Hubby asked me if I could make some things for their babies.

Hubby neglected to tell me that the Boise State colors are bright blue and bright orange :)

BoiseState

Remember how I said in my last post that the Lacrosse Girl fabric wasn't as hot pink as it might appear on your monitor? Yeah. This fabric really is just as bright as it appears on your monitor!

Hubby assures me that his friends' wives are Boise State fans, too. I hope so, because women have to stick together, and I don't want to force some poor new mom to dress her child in orange and blue!

Anyway, aside from the fabric, nothing new from a sewing perspective. For the big boss, I made a sleep sack (McCall's 4236), fleece pants (Katrina pattern), a "soft shirt" out of a onesie, and fleece booties (Mini Mocs). Since spring is just around the corner, everything is 6-12 month size, for wearing next winter.

IMG_1980

It's hard to read, but the fleece booties say "Boise State" on the heels:

IMG_1982

I debated over what to use for the soles. I considered using the faux suede or the anti-slip sole material that I've used on Mini Mocs for Noob and Littles. But I eventually decided that it would be cute to do more Boise State fleece on the soles, and that this would work fine since the baby likely won't be walking when he wears them (and therefore won't need a grippier sole). So, here's what the bottoms look like:

IMG_1983

Here is another view of the onesie sleeves. The onesie is another one of the ones I picked up on clearance at Babies R Us.

IMG_1981

Since I have so many onesies and so much fabric, I made a second onesie in 0-3 month size that just has the "Boise State" logo on it. Just so Hubby's boss doesn't have to wait quite so long to dress his baby in blue and orange!

For Hubby's co-worker, I just did a "soft shirt" onesie and a pair of fleece pants:

IMG_1992

I'm glad I was able to finish all that without being blinded by the colors :)

Tuesday, March 15, 2011

New baby gifts

I have an obscene number of friends expecting babies right now. Seriously, it’s out of control... seems like half my Facebook friends list is pregnant or married to someone who is! Maybe I need to defriend Hubby on Facebook, so that his wife doesn’t turn up pregnant :) Anyway, it means I’ve been busy in my sewing room, working on gifts for all the new arrivals!

First up was yet another sleep sack using McCall's 4236.

IMG_1367

I made this one for B, who is one of my very best friends in the whole world. He was the one who first introduced Hubby and me, nearly 9 years ago! Sadly, he lives in Los Angeles now, so I don't see him anywhere near as often as I'd like. But he is a huge basketball fan, so when I saw this fabric (in the Joann's remnant bin, of course), I immediately thought of him.

He and his wife are expecting their second son later this month, so that gave me a good excuse to use up the fabric. I figured that it's already too warm for fleece sleep sacks in Los Angeles, so I made it in a size medium (6-12 months), so they can hopefully use it next winter.

More baby gifts coming in future posts...

Saturday, March 5, 2011

My first paid project :)

My friend T is expecting her second baby this month, and is planning to cloth diaper, so she asked if she could pay me to make her some wet/dry bags for her to send with her baby to daycare, like the ones I made for Noob's sitter. I warned her that I'm really not very good at sewing, but she was still up for it!

So, off I went to Joann's. I took a bunch of pictures of fabric and sent them to T, for her to choose what she wanted. She picked out a really cute dots print for the exterior, and I found some coordinating fabric for the lining of the wet and dry pockets. The dark blue is broadcloth (cotton) for the dry pocket, and the turquoise is PUL for the wet pocket:

IMG_1214

Right before I started cutting and sewing, the PUL delaminated on my own wet/dry bags :( Basically, PUL is made by laminating a waterproof layer of plastic-y material to polyester fabric. When it delaminates, the waterproof layer separates from the fabric. This definitely isn't good, but even worse is if you then throw it in the dryer, the laminate melts slightly and sticks to itself, often causing a hole when you try to separate it later.

IMG_1281

Not good if you want your bag to stay waterproof! And once it happens, there's nothing you can do about it.

Luckily, I was able to return the PUL I had bought from Joann's (yeah, I am not using Joann's PUL ever again!) and order some from fabric.com instead. Hopefully it will hold up better...

Another problem I had with my own wet/dry bags is that on one of them, the fabric pulled through the stitching on one edge of the dry pocket, probably because my stitching was so close to the edge of the fabric. Anyway, this created a small hole. In the dry pocket, a hole is mostly a cosmetic problem, but it is certainly one I wanted to avoid on T's bags. So I sewed hers with a 1/2" seam allowance, rather than the 1/4" seam allowance that I used on my own. That gave me a slightly larger margin for error when sewing. I was also very careful to match up edges of all of the layers of fabric, to ensure a decent-sized seam allowance on each layer. This was tricky for the exterior layers, since there are four separate layers that need to match up (the two exterior layers plus the two layers making up the lining of the dry pocket), but I checked carefully after sewing and it looked like I did a good job.

Finally, I did a better job on the handles than I did on either of my bags. I cut the handles out of one piece of the dots fabric and one piece of the dark blue broadcloth. Each piece was roughly 12" x 4". I sewed the two pieces together, turned them inside out, folded in half, and topstitched the entire thing. The result is a handle that matches the bag perfectly and is not at all flimsy. As with my own bags, I added a snap on the handle, so that it can either hang (e.g. from a doorknob) or snap around something (like the handle of a stroller).

It was a lot of work... I spent a lot longer on these than I did on my own bags, really trying to get them as close to perfect as I could for T. I love how they turned out :)

IMG_1271

I used light blue zippers, which look really nice with the blue dots:

IMG_1272

Unzipped, showing the interior layers:

IMG_1273

When I was done, I had some leftover scraps. I also had a 7" zipper that I purchased ages ago and never used. So I decided to surprise T by making a small wetbag for wipes.

IMG_1274

After sewing so many wet/dry bags, making a simple wetbag was sooooooo easy :) Here's a shot of the inside, showing that same turquoise PUL.

IMG_1278

Then I figured, well, what is a wipes bag without wipes? I have a yard of flannel that I purchased almost a year ago for a project that I ended up abandoning, so I decided to use it to make some wipes. Since the wipes bag I made is pretty narrow (I typically use a 9" zipper for my wipes bags, rather than 7"), I made the wipes narrow as well. I cut rectangles of flannel approximately 4.5" x 8.5". This size fits well in the wipes bag and also fits perfectly in an old disposable wipes container (which is what I use at home to store my cloth wipes). I put aside 10 wipes for T, but kept a few for myself, too :) Hey, Noob has had a runny nose for the last week or two (teething, I think?) and cloth wipes make excellent Kleenex's, so I like having lots on hand!

IMG_1276

IMG_1277

While I was working on all this, I got to talking to T about the wonders of wool as a diaper cover. She bought one of Noob's newborn wool sets from me to try out, and I figured I'd throw in a bonus pair of recycled wool longies. The legs came from the sleeves of a sweater in that big box of wool sweaters I bought for cheap, and the waistband came from an old turtleneck sweater of mine that no longer fits, as it has become a little too felted over the years. I used the Katrina pattern (same one I used for Noob's longies) in newborn size.

IMG_1270

These look really itty-bitty, so I'm not sure they'll even fit T's baby. But I was just glad to get rid of a little more fabric out of my stash!

T got it all yesterday and she says she loves it! I hope she's not just being nice!

Sewing for a paying customer is a little stressful for me, but it was a good experience overall. I might do it again in the future if the opportunity presents itself!