Showing posts with label wool. Show all posts

Sunday, April 24, 2011

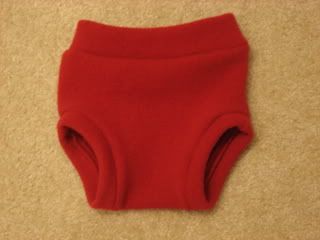
More wool shorties

IMG_2840

Yeah, yeah, another pair of wool shorties. I've almost got enough to call it good for the summer months -- well, unless Noob outgrows the smalls over the course of the summer. Which is likely. At which point, you'll be subjected to more of these posts as I sew up mediums. Sorry.

Anyway, I got the sweater that I used for this pair during the same thrift store run where I got the one that I used for the last pair. I think this one cost $1.50 -- expensive, I know! :) But here's why I was willing to pay that much. For starters, I love the color. It's very denim-y, so I think it will work nicely with shirts that I'd normally pair with jeans. Also, I love the wool. I mentioned previously that lambswool is probably my favorite type of wool for diaper covers. My second-favorite type of wool is cashmere. It's not quite as thick as lambswool and tends to stretch out easily, but it is soooooo soft! Well, guess what this sweater was made out of? 95% lambswool/5% cashmere! It is soft like cashmere, but feels like it will hold up better like lambswool. It's also a nice weight for hot Texas summers, not as thick/hot as lambswool but more substantial than cashmere.

As always, I used the Katrina pattern, size small. I used the ribbing from the bottom of the sweater for the waistband, and cut it one size smaller since it's so stretchy.

I love how these turned out. I think they'll see a lot of use this summer!

IMG_2805IMG_2801

Friday, April 22, 2011

What can you get for $1?

Hubby and I do most of our shopping for kids' clothes at thrift stores. There are a couple of awesome ones near our house, and it makes no sense to pay $10 or more for a piece of clothing that will be worn for just a few months. So, I did some shopping for the kids a few weeks ago, and stopped by the men's sweater rack while I was there to see if there were any good items for upcycling into diaper covers. I know, I know, I should really limit myself to sewing out of my massive box of sweaters that I got for $10, but... well, what can I say. I'm not that disciplined. And anyway, the sweater rack is pretty hit or miss, so it's by no means a certainty that I'll find anything good when I look.

Well, turns out that it was a "hit" day. I picked up three nice wool sweaters for a grand total of $3.50.

Here is the first one. It was priced at $4, but since it was sale day at the thrift store, it was only $1. (Yeah, that's right, I'm so cheap that I don't even shop thrift stores: I shop sale days at thrift stores.)

IMG_2670

It's from American Eagle Outfitters. 100% lambswool, which is one of my very favorite types of wool for upcycling, because it is usually soft but still nice and thick. Men's size extra large, which meant that even after I felted it slightly (by washing on warm and then drying on high) to make it a little thicker, it was still plenty big.

So, I got to cutting and sewing. And after a few hours, I had this:

IMG_2727

Top left - Soaker, Katrina pattern size medium, made out of the body of the sweater.

Bottom left - Shorties, Katrina pattern size small, made out of the bottom of the sweater's body.

Right - Longies, Katrina pattern size medium, made out of the sweater sleeves.

Now for some action shots! The soaker is a little big on Noob, but not too bad:

IMG_2753IMG_2742

By the way, I cheated on this one :) I didn't have enough fabric in the sweater for an extra wetzone layer, so I cut one out of a coat (from my $10 box of sweaters... so I did use it!). It's super thick, so this soaker should be pretty bulletproof. Here's a shot of the inside with the extra layer:

IMG_2731

Here are the shorties. They are a little long, because I cut them the same length as the other pair of shorties I made, forgetting that I wouldn't be hemming these ones :) (I used the finished edge of the bottom of the sweater instead.)

IMG_2714IMG_2712

And the longies. Obviously, Noob won't have any use for these until next winter, so I made them pretty big:

IMG_2725IMG_2722

IMG_2724

Not bad for a buck.

Monday, April 4, 2011

Wool shorties

It's starting to heat up down here in Texas, and Noob's wool longies are getting to be a little too toasty. So during yesterday's naptime, I sewed up a pair of wool shorties. Same idea, just a shorter length.

IMG_2420

I used another one of the wool sweaters out of my huge box that I bought for $10. This one is a little scratchier than the one I used for the longies, but not too bad. It looks black in this picture, but it's actually dark blue in color.

As always, I used the free Katrina pattern. Size small with about a 3" inseam after hemming.

For the waistband, I used the ribbing from the bottom of the sweater, in a single layer (rather than the double layer that the pattern calls for). The ribbing is really stretchy, so I made the waistband one size smaller than the body of the shorties, and it's perfect. It also has that contrasting gray trim, which looks really cute!

Have I mentioned how much I love this pattern? It is so easy and versatile.

Saturday, March 5, 2011

My first paid project :)

My friend T is expecting her second baby this month, and is planning to cloth diaper, so she asked if she could pay me to make her some wet/dry bags for her to send with her baby to daycare, like the ones I made for Noob's sitter. I warned her that I'm really not very good at sewing, but she was still up for it!

So, off I went to Joann's. I took a bunch of pictures of fabric and sent them to T, for her to choose what she wanted. She picked out a really cute dots print for the exterior, and I found some coordinating fabric for the lining of the wet and dry pockets. The dark blue is broadcloth (cotton) for the dry pocket, and the turquoise is PUL for the wet pocket:

IMG_1214

Right before I started cutting and sewing, the PUL delaminated on my own wet/dry bags :( Basically, PUL is made by laminating a waterproof layer of plastic-y material to polyester fabric. When it delaminates, the waterproof layer separates from the fabric. This definitely isn't good, but even worse is if you then throw it in the dryer, the laminate melts slightly and sticks to itself, often causing a hole when you try to separate it later.

IMG_1281

Not good if you want your bag to stay waterproof! And once it happens, there's nothing you can do about it.

Luckily, I was able to return the PUL I had bought from Joann's (yeah, I am not using Joann's PUL ever again!) and order some from fabric.com instead. Hopefully it will hold up better...

Another problem I had with my own wet/dry bags is that on one of them, the fabric pulled through the stitching on one edge of the dry pocket, probably because my stitching was so close to the edge of the fabric. Anyway, this created a small hole. In the dry pocket, a hole is mostly a cosmetic problem, but it is certainly one I wanted to avoid on T's bags. So I sewed hers with a 1/2" seam allowance, rather than the 1/4" seam allowance that I used on my own. That gave me a slightly larger margin for error when sewing. I was also very careful to match up edges of all of the layers of fabric, to ensure a decent-sized seam allowance on each layer. This was tricky for the exterior layers, since there are four separate layers that need to match up (the two exterior layers plus the two layers making up the lining of the dry pocket), but I checked carefully after sewing and it looked like I did a good job.

Finally, I did a better job on the handles than I did on either of my bags. I cut the handles out of one piece of the dots fabric and one piece of the dark blue broadcloth. Each piece was roughly 12" x 4". I sewed the two pieces together, turned them inside out, folded in half, and topstitched the entire thing. The result is a handle that matches the bag perfectly and is not at all flimsy. As with my own bags, I added a snap on the handle, so that it can either hang (e.g. from a doorknob) or snap around something (like the handle of a stroller).

It was a lot of work... I spent a lot longer on these than I did on my own bags, really trying to get them as close to perfect as I could for T. I love how they turned out :)

IMG_1271

I used light blue zippers, which look really nice with the blue dots:

IMG_1272

Unzipped, showing the interior layers:

IMG_1273

When I was done, I had some leftover scraps. I also had a 7" zipper that I purchased ages ago and never used. So I decided to surprise T by making a small wetbag for wipes.

IMG_1274

After sewing so many wet/dry bags, making a simple wetbag was sooooooo easy :) Here's a shot of the inside, showing that same turquoise PUL.

IMG_1278

Then I figured, well, what is a wipes bag without wipes? I have a yard of flannel that I purchased almost a year ago for a project that I ended up abandoning, so I decided to use it to make some wipes. Since the wipes bag I made is pretty narrow (I typically use a 9" zipper for my wipes bags, rather than 7"), I made the wipes narrow as well. I cut rectangles of flannel approximately 4.5" x 8.5". This size fits well in the wipes bag and also fits perfectly in an old disposable wipes container (which is what I use at home to store my cloth wipes). I put aside 10 wipes for T, but kept a few for myself, too :) Hey, Noob has had a runny nose for the last week or two (teething, I think?) and cloth wipes make excellent Kleenex's, so I like having lots on hand!

IMG_1276

IMG_1277

While I was working on all this, I got to talking to T about the wonders of wool as a diaper cover. She bought one of Noob's newborn wool sets from me to try out, and I figured I'd throw in a bonus pair of recycled wool longies. The legs came from the sleeves of a sweater in that big box of wool sweaters I bought for cheap, and the waistband came from an old turtleneck sweater of mine that no longer fits, as it has become a little too felted over the years. I used the Katrina pattern (same one I used for Noob's longies) in newborn size.

IMG_1270

These look really itty-bitty, so I'm not sure they'll even fit T's baby. But I was just glad to get rid of a little more fabric out of my stash!

T got it all yesterday and she says she loves it! I hope she's not just being nice!

Sewing for a paying customer is a little stressful for me, but it was a good experience overall. I might do it again in the future if the opportunity presents itself!

Wednesday, February 9, 2011

Mini Moc madness!
IMG_0908

I sewed up two more pairs of Mini Mocs last night. The ones on the right are made out of the gray wool from the same sweater I've already used to make a previous pair of Mini Mocs and two pairs of longies. That one sweater went a long way! It's finally gone, though :)

The ones on the left are denim, lined with fleece. The denim is from some old pairs of jeans of mine. For some reason, these days, I am always getting holes in the knees of my jeans. I think it has to do with having kids and crawling around down on the floor a lot more. Anyway, last summer, I had three or four pairs of jeans with holes in the knees, and only one pair of jean shorts. So I cut off the jeans and hemmed them to make jean shorts. They don't look great (jeans are much tighter on the thighs than actual jean shorts...) but they're functional.

That project left me with a bunch of scraps of denim. I saved them, thinking surely I could find some use for them. And I finally did! :) For the topstitching on these Mini Mocs, I used the same thread that I used on the hems of my "new" jean shorts. I got it at Wal-mart. It's the same brownish-yellow color as the thread that is used on the stitching for actual jeans, and it's stronger than normal thread to hold up while sewing thick denim. It works well and looks good.

Here's a close-up of the heel of the shoe, showing the stitching. I used the inside seam of the jeans on the heel, mostly because it was hard to find a wide-enough strip of material that did not have a seam :) But I think it looks cute, too!

IMG_0910

I did goof a little while sewing these, and the shoe on the right in the first picture above is noticeably narrower than the one on the left. This is because I did leather soles (on the denim shoes and also the wool ones), and you can't really pin leather. That makes it tricky to get all the layers of fabric lined up correctly so that you can get the right seam allowance. It's also tricky to get the right seam allowance when you're sewing on a curve, as you have to do with shoes. So I ended up stitching a little too far from the edge of the sole on that shoe, resulting in it being narrower than it should. I think I may redo it when I get the chance, since I still have plenty of denim left!

I should mention that I purchased special leather sewing needles and heavy thread to use for sewing these soles on to the shoes. Those supplies are easy to find at Joann's.

Once I redo that one denim shoe, I think I'm done with shoes for a while. At least until Noob outgrows these shoes and needs new ones :)

Monday, February 7, 2011

Even more Mini Mocs

IMG_0904

The Mini Mocs that I sewed for Noob about a month ago have seen a ton of use! They're working out beautifully. So I'm working to sew up a few more pairs, to give him some more stylin' shoe options. This pair is made out of scraps from the same wool sweater that I used to make his longies.

The soles are leather, made out of a genuine leather skirt that I bought at a local thrift store for 99 cents. Leather should be more durable than the faux suede that I used on the other pair of Mini Mocs (although the faux suede is holding up nicely too, and washes really well).

IMG_0905

Of course, they coordinate perfectly with his new longies! (Ignore the shirt, which doesn't coordinate so well with either.)

IMG_0891

IMG_0893

IMG_0896

Hee hee :)

IMG_0897

Sunday, February 6, 2011

Wool longies

IMG_0837

We've been snowed/iced in for the better part of the last week, and Noob has been pretty much living in wool longies over prefold diapers.

Prefolds are the "old-fashioned" cloth diapers that are basically a big square of cotton. Since they are just cotton, they soak through as soon as they get wet, so they need some kind of cover over them to keep the moisture in.

Covers made out of PUL (polyurethane laminate) are the most popular option these days. PUL is easy to wash and comes in all sorts of fun colors and prints. But in the olden days, moms used wool covers over diapers, and wool is still a great option today!

  • It absorbs up to 30% of its weight in liquid. (PUL simply keeps the liquid in but doesn't absorb.) That makes it a great choice for heavy wetting babies.
  • It's breathable, allowing air to circulate, rather than locking moisture in and air out like PUL does.Ever heard of letting a baby go diaperless to "air out" a diaper rash? Using a wool cover is the same idea, but much less messy!
  • Although it does have to be hand washed, you only have to wash it once every few weeks! The lanolin in wool neutralizes urine odor, so the wool doesn't stink.

Wool longies are basically wool pants, so they're a diaper cover and an article of clothing all in one. They are so cozy in winter, they make for easy diaper changes on squirmy older babies like Noob (I just get his diaper on quickly and then I can let him stand up while I put on his longies), and they are nice and trim. Noob has been rotating through two pairs of longies and he desperately needs more!

Luckily, wool is a great material for rookie sewers! It is much easier to work with than PUL. (PUL tends to be slippery, you have to be careful about poking too many pin/needle holes in it because then moisture can escape, etc.) It's also easy to find for cheap at your local thrift store, or possibly even in your closet!

Indeed, in my closet, I have two big boxes of wool sweaters that I got from a local mom who was moving and wanted to get rid of them. I paid $10 for probably 20 or 25 sweaters! The one I used for these longies was one of my favorites. It's a super soft lambswool sweater from J.Crew.I should have taken a "before" picture, but here's the sweater after I cut it up. You can sort of see that the body of the sweater was a heather gray and the sleeves were black:

IMG_0836

I felted the sweater slightly, which basically means washing it on warm or hot water, and drying it in the dryer. This causes the wool to shrink and thicken up, which makes it better at keeping moisture in. Be careful of overfelting... in the past, I've felted sweaters so much that they barely stretch anymore. Longies made of overfelted wool are very hard to get onto a baby! I got this one just right. It's nice and thick, but still stretchy.

I used the Katrina pattern for longies to make the longies. It's easy to sew, it fits great, and it's completely free. I used a size small for Noob, who is right around 20 lbs. Note that you can also use the Katrina pattern to make fleece longies, but the sizing is really different in wool vs. fleece. Noob is a size medium in fleece longies.

I cut two of the longies pattern from the gray body of the sweater. Important: The pattern is not symmetrical. It's cut higher in the back than in the front (to fit over bulky cloth diapers). You need to make sure to flip the pattern over when cutting the second piece, or cut on the other side of the fabric. So when you put the fabric wrong sides together (or right sides together, for that matter), they should match up perfectly. I hope that makes sense. When I first sewed this pattern, I cut two identical pieces and then they didn't fit together when I went to sew them!

Anyway. The sleeves of this sweater were wide enough that I was actually able to cut them open and lay them flat, then use the pattern to cut the pieces, just like I did with the body of the sweater. In the past, I've also used this tutorial to make longies out of sweater sleeves, but I find it's a little harder to get the sizing just right.

I cut a black waistband out of the scraps from one of the sleeves. I couldn't get a long-enough contiguous piece of gray fabric, so I cut two smaller pieces (adding an extra half inch to the total length) and sewed them together..

Then I sewed the black waistband on the gray pants, and vice versa, for a nice contrasting effect. Done! It only took me about an hour to sew up both pairs of longies once I got all the fabric cut. Easy!

And oh-so-cute...

IMG_0852

IMG_0849IMG_0858IMG_0881

I love these already! They fit Noob perfectly. I'm sure they'll see a lot of use during these last few weeks of winter, and even into the spring.

Monday, December 6, 2010

The beginning

I got my start as a sewer a little over a year ago.

I was using cloth diapers on my daughter, Littles (age 2 at the time), and had really started to love wool longies. Longies are pants that double as cloth diaper covers. They're trimmer than most cloth diaper options, they're more absorbent, and they're easy to get on a toddler who doesn't like to sit still for diaper changes! There's only one problem: They can be expensive! One of my main reasons for using cloth diapers is to save money, so spending $20 or more on a pair of longies just wasn't going to happen.

But then I heard about people sewing longies out of old wool sweaters, purchased for just a few dollars at a thrift store. I even found a free longies pattern online. Now we're talking. There was only one problem: I didn't know how to sew. And I'm not a crafty person. At. All. It seemed easy enough, but was I getting in over my head?

Undaunted, I asked around to see if any of my friends had a sewing machine, in hopes that I could give sewing a try without investing any money. Sure enough, one of my friends was happy to let me borrow hers. One night, I put my daughter to bed and then sat down with the borrowed sewing machine (and its manual), a free pattern for wool soakers (diaper covers), and an old wool sweater of mine that had a hole in it. A few hours later, I had this:

Photobucket

Not the prettiest thing, but it worked beautifully as a cover for Littles' overnight diapers until she outgrew it about six months later!

Encouraged, I hit up my favorite local thrift store on their half price day, walked away with an armload of sweaters for less than $10... and a few nights later, I had a couple of pairs of longies for Littles.

Who then promptly potty trained. Oh well.

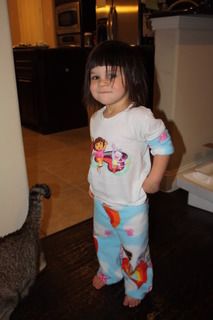
But I did have another baby on the way, so I sewed up some longies for him. And when I got a good deal on Dora the Explorer fleece, I made some pajamas for Dora-obsessed Littles as a Christmas present:

Photobucket

The friend who originally lent me the sewing machine decided to get a new one, so she was happy to sell her old one to me for cheap. I was on my way.

After Noob's arrival in late January, I was too busy to sew for quite a while. But I've slowly gotten back into it, and I've found more and more fun projects to work on. I love it!

I decided to start a blog to share what I'm doing, and hopefully encourage other rookie sewers to jump on in. The water is fine!