Showing posts with label pajamas. Show all posts

Monday, July 25, 2011

Tutu pajamas

In my diaper-sewing posts, I've mentioned a couple of times that I've also been working on non-diaper projects. This was one of them:

IMG_7470

I finished this back in May, I think. It's a pair of pajama shorts for Littles. Pattern is Simplicity It's So Easy 2738. As I've done on similar projects, I did french seams on the legs and crotch to prevent raw edges. (This was pre-serger; I'm sure I'll end up making stuff like this again, and when I do, I'll use the serger to sew and finish the edges all at once!)

The flannel is from Joann's. It's the same stuff I used to make the pillow for Littles' nap mat.

I thought Littles would love them because of the ballerinas, but alas, like just about everything I sew for her, she had no interest in wearing them. To be fair, she refuses to wear shorts in general, not just the ones I make. But a month or so after sewing these shorts, I came across this tutorial for a "tutu t-shirt." Since Littles loves tutus, I thought it might be the perfect top to revive her interest in these shorts.

The end result:

IMG_7471

I made one semi-major goof while sewing this. When it came time to sew the tulle onto the bottom of the shirt, I lost my mind for a minute and thought that you sew fabric with wrong sides together. So I turned the shirt inside out to sew the tutu on. Of course, that's not correct; you usually sew with right sides together. Oops! The result is that the hem of the shirt turns up slightly, and also, the basting seam I used to gather the tulle is slightly visible. Here's a close-up:

IMG_7472

Of course, the seam looks much better from the inside (i.e. what was supposed to be the right side). Here, the seam you see above the tulle is just the original hem seam from the t-shirt, so that wouldn't be visible had I sewn it the right way. See how much smoother the seam looks in this picture?

IMG_7473

I could have ripped out the seam and sewn it again, but that would've taken quite a bit of time -- and, well, these are pajamas, so who cares if the seam is less than perfect? I'll wait and see if Littles actually wears this before investing that kind of time into fixing it :)

The complete set:

IMG_7474

Littles was super excited about the shirt, but not so excited about the shorts. Still, she humored me:

IMG_7479

Ugh, that turned-up seam is driving me a little bit nuts, but I'm trying to quell my inner perfectionist.

Tuesday, July 19, 2011

Still more baby gifts

4f (2)

As I mentioned previously, I had an insane number of friends expecting babies. I think there have been four new arrivals just since the beginning of June! Now I have a few months off before another mini-boom coming in December/January...

Anyway, I've been working on the stuff above for quite a while, and finally got around to finishing it up. It's for Hubby's friend D and his wife, who just welcomed their first baby, a little girl. D's wife went to Oklahoma University (OU), hence the fabric choice :)

Nothing super exciting here, all stuff I've done before...

  • Sleep sack: McCall's 4236, size medium
  • Pants: Simplicity 2291, size small
  • Onesie: From the Babies R Us clearance back in March, with one of the fleece squares sewn onto it.

Yes, it felt pretty funny sewing a bunch of fleece with temperatures well over 100 degrees these days, but that's why I made everything in 6-12 month size!

Saturday, June 25, 2011

Pajama shorts: Fathers Day present

Hubby wore his Cowboys pajama pants all winter long, but with temperatures in the triple digits these days, it's a little warm for fleece pants! With Fathers Day right around the corner and a bunch of Cowboys flannel in my fabric closet (I bought it a while back... I can't even remember what I originally planned to use it for), I knew exactly what I needed to sew next:

IMG_5500

Pajama shorts! Pattern is Simplicity 9330, size large. I sewed it pretty much as instructed, except for doing french seams instead of leaving raw seams on the inside. Very easy to sew. They're pretty baggy -- I think I could have easily gotten away with a medium or even a small instead. But for pajamas, baggy is fine.

I paired it with two picture frames with pictures of each kid. Did I do good? :)

IMG_5501

Monday, May 23, 2011

Camouflage

Fabric.com has free shipping for orders over a very reasonable $35, so I usually throw some extra fabric into my order to get to that threshold. As part of my recent order that included the "Army Strong" fabric and the fabric for another project (which I'm still working on and will show off in a few weeks here), I threw in some extra knits that were on sale. One was a camouflage print that I thought Hubby would like almost as much as "Army Strong."

IMG_3838

This is the Very Baby Basic AIO pattern again, size medium. I've realized that the medium size is just a little short for Noob in the rise -- it works OK for now, but I know he'll outgrow it pretty soon. So I'm currently experimenting with a "medium long" size, which is the same width with a longer rise. But I wanted to sew up one more medium using this camo fabric, to see how it fit. It is stretchy, and stretchy fabrics generally fit a wider size range.

I also wanted to try snaps, to see if the stretchy fabric made it easier to get a good fit with snaps. The Basic AIO pattern only comes with markings for aplix, but there are instructions on this page for making it with snaps instead. I opted to add the snaps prior to sewing the diaper, so that the snap caps wouldn't be exposed on the diaper interior. That also made it pretty easy to get the snaps lined up fairly straight.

By the way, that tutorial calls for three snaps on the wings, just like the Darling Diapers Unlimited pattern. I had complained about that when I sewed a DDU with snaps, but now I realize that the third snap is to prevent wing droop. It works well!

I did crossover snaps to allow the diaper to fit smaller waists. This is covered in the tutorial linked above:

IMG_3839

Diaper front, fully unsnapped. I forgot to make the bottom row of snaps one snap shorter than the top row. No biggie; that last snap just won't ever get used. Actually, I don't think the last two snaps on the bottom row will ever get used.

IMG_3841

Diaper inner. Bamboo velour with a hidden layer of bamboo fleece. See how the snap caps are not visible on the inside front of the diaper? The soaker is a layer of bamboo velour and a layer of bamboo fleece, trifolded. I made this soaker a little longer than the one I did on the Army Strong diaper (it's 14" long by 12" wide, compared to 12" by 12" for the Army Strong soaker) because I've found that the Army Strong soaker is a little shorter than I'd like once the diaper is put on.

IMG_3840

Action shots. You can see that the fabric really does stretch to cover Noob well in the rise:

IMG_3859 IMG_3846

I also like how the stretchy fabric helps the snaps fit right. Snapping diapers normally bug me, but this one doesn't. Although I will say that Noob is towards the top of the medium size's listed weight range (range is given as 15 lbs to 25 lbs, and he is 23 lbs right now) and he is on the crossover snaps -- the fabric stretches that much. I'm not sure this will fit a baby who is lower in the weight range. If I make one of these out of stretchy fabric again, I may shorten the wings a little bit, so that it will fit skinnier babies.

IMG_3860 IMG_3842

I've been working on another project with camouflage material. I got blue camouflage fleece to help "pad" another fabric.com order, so I decided to sew Noob a pair of pajama pants. I normally use the Katrina longies pattern to do this, but it's really cut to fit over big cloth diapers, and I have some upcoming projects where I need to sew pants for non-cloth diapered babies. I already have the McCall's 5963 pattern (it's what I used to make those awful footed PJs), and it includes a pants pattern, so I gave it a whirl. I made a size large, which is listed as fitting 22-25 lbs.

IMG_3813

It seems to be really big, especially in the rise, but it matches up almost exactly with a pair of Carter's (store-bought) knit pants in 18 month size (on the left). It's bigger than Katrina pattern size mediums (on the right), but that makes sense, since Noob has really outgrown that pair of longies. You can see how the rise on the longies matches the rise on the new pants, even though the longies are made to fit a smaller baby:

IMG_3887 IMG_3890

Action shots over a prefold (pretty close to disposable diaper trimness). They are a little baggy, but they don't fall down, which is my main concern!

IMG_3897 IMG_3905

But they are easily big enough to work as pajama pants over a seriously fluffy bum. In these pictures, Noob is wearing the pants over the wool soaker from this post and the camo diaper. This is bulky, but it's a bulletproof overnight setup! The diaper is absorbent enough and the soaker is thick enough that I would be shocked if anything leaked out, but if it did, the pajama pants offer yet another layer of protection.

IMG_3864 IMG_3874IMG_3883

I always like to mention that the fleece pajama pants "trick" works with disposable diapers, too! I know a lot of people struggle with their kids leaking out of disposable diapers overnight. Putting a pair of fleece pajama pants like these over a disposable diaper can help keep the sheets dry in case of leaks.

Anyway, there you have it! My camouflage projects! I still have plenty of both fabrics left over, so I'm sure you'll see it again. I'm a little bit worried about the quality of both -- the diaper is already fading a little and the pants have some noticeable pilling after just one wash. Hopefully, they won't continue to age that quickly.

Monday, March 21, 2011

Lacrosse girls


IMG_1506

I help coach a high school girls lacrosse team. The other coach, "L," has two kids of her own and a third on the way (yes, yet another pregnant friend!). We both bring our kids to practices and games fairly regularly, so my kids and I know L's kids pretty well.

About a year ago, I was browsing around at Joann's when I saw a really cute "Lacrosse Girl" flannel print. It immediately made me think of Littles and of L's daughter, "J." (Note: For some reason, my pictures of this print show up super hot pink on my monitor. If they show up that way on yours, trust me, the fabric wasn't that bright in person.)

At the time, I didn't really know what I could do with flannel, but I still bought 3 yards of it, figuring I could find something! Now I'm wishing I bought a lot more, as I have tons of project ideas that could use flannel. Sadly, the fabric was on the Red Tag (clearance) shelf when I bought it, so I doubt it's ever coming back...

But I did make a little drawstring backpack for Littles a few months ago. I use it to keep coloring books, dolls, and other little things for her to amuse herself with when she's on the sidelines at lacrosse games. And with J's birthday approaching, I pulled the fabric out again to see what else I could do with it.

I decided to make her some pajamas. I didn't have quite enough fabric to make pajama pants, but with spring right around the corner, I figured that short-sleeve pajamas were perfectly appropriate.

IMG_1463

The pattern is a kids pajamas pattern that I bought ages ago. It's Simplicity It's So Easy 2738.

I had to totally guess on J's size. She is turning 6, so I went ahead and made a size 7. I figure that baggy pajamas are OK, and besides, for kids stuff, they can always grow in to something that is too big, but they can't shrink to fit into something too small! Also, sizes 3-6 were on one part of the pattern paper and sizes 7-12 were on another, so by making a size 7 for J, I'm able to use the same pattern envelope to make stuff for Littles in a smaller size :)

A couple of modifications I made:

  • I did french seams to prevent the flannel from fraying along the raw edges.
    How I did it: The pattern called for a 5/8" seam allowance. For each seam, I put the fabric with right sides facing out, rather than wrong sides, like you usually do when sewing. I sewed with a 1/4" seam allowance. Then I turned the fabric inside out, so now I had wrong sides together, as usual. I sewed with a 3/8" seam allowance, enclosing the previous seam allowance (and its raw edges) inside. The result was a 5/8" seam (only 3/8" visible) with no raw edges.
  • I did a drawstring waist instead of elastic, since I don't know how big J's waist is and I didn't want them falling off her.
    How I did it: For the drawstring, I cut a long strip about 1.5 inches wide. I folded it in half and ironed it down, then turned in a little bit (about 1/4") on the raw edges and ironed those down as well. I did a straight stitch seam to sew the two sides together. I left the edges unfinished until later.
  • The drawstring waist meant that I needed holes on the casing at the waist where I wanted the drawstring to come out.
    How I did it: Just before sewing down the casing at the waist, I marked where I wanted the holes. Since flannel frays easily, I didn't want to leave the holes unfinished, so I did buttonholes, using the automatic buttonhole feature of my sewing machine (a Kenmore). It took me a few tries practicing on scrap flannel, but once I got the hang of it, it was easy, and the holes turned out nicely! Once the holes were sewn, I sewed down the casing all the way around (following the original directions), then used a safety pin to thread the drawstring through the holes and around the casing.
    Here's a close-up of the finished drawstring and holes:
    IMG_1509
  • The pattern includes a matching top, but I didn't have enough fabric for that, so I decided to just embellish a plain t-shirt instead. I really wanted a white t-shirt, but I couldn't find one in J's size in time, so I grabbed a hot pink one instead. It actually worked nicely with the flannel's colors.
    How I did it: I cut out a piece of the flannel and pressed the edges under, then sewed around. This left neatly finished edges that won't fray.
    IMG_1465
    Hubby asked if it was upside down. Haha. No! The lacrosse sticks are right side up, and there is a smaller "Lacrosse Girl" at the top that is also right side up.

With J's birthday present finished, I decided to work on a gift for the new baby, who is due in July. L just found out that it's a girl! So she clearly needs matching Lacrosse Girl gear!

IMG_1498

The pants are from Simplicity 2291. I wasn't thrilled with the way they turned out. They are huge! I was debating over whether to make small (3-6 month size) or medium (6-12 month size), given that we do live in Texas, so the new baby may not need pants until she's past 6 months old :) I decided to make the small size, but they turned out to be closer to 6-12 month size anyway! Here they are on a real live 1-year-old :) Noob is solidly in 12 month size pants, and these fit him pretty well:

IMG_1475

Aside from being larger than I expected, the pattern did work well for pajama pants, but I wouldn't use them to make actual pants (which is what the pattern was really intended for). They're too baggy.

The one modification I made to the pattern was to do french seams, as I did on J's shorts. I didn't like that J's shorts ended up with a somewhat bulky 3/8" seam allowance that couldn't be trimmed, so on these pants, I first sewed with a 3/8" seam allowance, then trimmed it down, then turned the fabric and sewed with a 1/4" seam allowance. This still gave me the required 5/8" seam allowance, but the seams weren't as bulky.

I paired the pants with an embellished onesie. One of our nearby Babies R Us stores is moving locations, so they put the whole store on sale for the last few weeks to clear out their inventory before the move. I bought a bunch of plain white onesies in a variety of sizes at 50-75% off, so I can do embellished onesies for all of my pregnant friends and any more who turn up in the future :)

As on J's shirt, I embellished using a scrap from the flannel. I used a much smaller scrap for the onesie, since it's much smaller than J's shirt :) I also accidentally cut the scrap without a whole lot extra around the edges, so rather than folding under the raw edges, as I did on J's shirt, I secured the scrap to the shirt using Heat n Bond Lite, then used a satin stitch all around the edges. This should do a good job of preventing fraying.

IMG_1499

I'm pretty proud of these two sets! I think they turned out really well, and they weren't at all hard to put together (just a little more than one night of work).

Tuesday, March 15, 2011

New baby gifts

I have an obscene number of friends expecting babies right now. Seriously, it’s out of control... seems like half my Facebook friends list is pregnant or married to someone who is! Maybe I need to defriend Hubby on Facebook, so that his wife doesn’t turn up pregnant :) Anyway, it means I’ve been busy in my sewing room, working on gifts for all the new arrivals!

First up was yet another sleep sack using McCall's 4236.

IMG_1367

I made this one for B, who is one of my very best friends in the whole world. He was the one who first introduced Hubby and me, nearly 9 years ago! Sadly, he lives in Los Angeles now, so I don't see him anywhere near as often as I'd like. But he is a huge basketball fan, so when I saw this fabric (in the Joann's remnant bin, of course), I immediately thought of him.

He and his wife are expecting their second son later this month, so that gave me a good excuse to use up the fabric. I figured that it's already too warm for fleece sleep sacks in Los Angeles, so I made it in a size medium (6-12 months), so they can hopefully use it next winter.

More baby gifts coming in future posts...

Tuesday, March 1, 2011

Footie pajamas

Lately, I've been working on some cool but top-secret stuff that I'll show off soon! But in between those projects, I finished up a pair of footie pajamas that I had started for Noob way back in December. The pattern is McCall's 5963:

IMG_1259

These didn't turn out as well as I had hoped :( Part of it is that I don't really like footie PJs anymore. Back in December, they worked great, but now that Noob is walking, he tends to trip over the fabric on his feet, and he doesn't have enough grip on our non-carpeted floors. A pair of pants (like his wool longies) with either bare feet or grippy soft soled shoes (like his various pairs of Mini Mocs) work much better.

But even putting that aside, the PJs themselves just didn't turn out well. They just fit really oddly. See how wide the neckhole is, and how baggy the body is?

IMG_1245

IMG_1229

I think they actually look worse in person than they do in these pictures...

Oh well! The fleece was cheap, and I got good practice with sewing zippers (this was my first project that involved sewing a zipper into a garment like this) and with using bias tape on the neckline.

Also, I really like the way that this pattern does the sleeves. They are cut at an angle towards the neck, rather than straight around the shoulder, like in the sleepsack with sleeves that I made. It makes them much easier to sew! This same envelope includes a pattern for a sleepsack with sleeves, so if I ever have the need to make one of those again, I'll probably try this pattern, rather than the sleeved version of McCall's 4236. Bagginess isn't such a big deal with sleepsacks!

Saturday, February 12, 2011

Another fleece sleep sack

IMG_0996

This one is made out of the same McCall's 4236 pattern that I've used to make sleep sacks in the past. I made it with long sleeves this time, as sometimes Noob doesn't have any clean long sleeve shirts at bedtime. So I think it'll be handy to have a sleep sack that he could wear over short sleeve shirts, even in winter. But to be honest, the sleeves were a pain to sew on, and they limit how long Noob will be able to use the sleep sack (hard to believe, but we probably won't be using heat anymore two months from now...) so if I do any more in this size, I'll probably do sleeveless again.

The fabric is Joann's blizzard fleece, in an ice hockey pattern -- Hubby plays ice hockey! I don't love the print, but it was in the remnants bin during the great 75% off remnants sale, when blizzard fleece was already on sale for 50% off. So I got four feet of it for about two dollars. I usually avoid blizzard fleece for cloth diapering stuff because it's not as stretchy as anti-pill fleece, making it tougher to fit over diapers, but for a sleep sack, stretch isn't too important.

Noob is sleeping in it tonight and it fits him well.

Thursday, February 3, 2011

Vidia slippers

Littles somehow managed to lose one (only one!) of the Silvermist slippers I made for her a few months ago. I know it's somewhere in the house. But it's freezing here right now and she's been off school for the last three days due to snow/ice and I'm tired of seeing her poor bare feet around the house. So I decided to sew her a new pair.

This time, I asked Littles what color she wanted, and she chose purple. In the Disney Fairies world, purple is Vidia's color:

Vidia

Vidia isn't one of the nicer fairies, but Littles loves her because she loves purple. I bought purple crushed panne months ago to make a Vidia costume for Littles (to go with her Tinker Bell and Silvermist costumes), but I haven't gotten around to it. Since she requested purple slippers, I figured I'd make them to match the Vidia costume that I will sew eventually :)

I used the same technique as the Silvermist slippers: Sew Darling Mini Mocs pattern, crushed panne for the outer, fleece for the inner, and anti-slip fabric for the sole.

IMG_0520

Hopefully we can keep track of these ones :)

Sunday, January 2, 2011

Soft shirts

About this time last year, when I sewed my first few pairs of fleece PJ pants for Littles, I had to figure out a way to make matching shirts. I had the idea to take plain t-shirts and embellish them appropriately, but I couldn't find reasonably priced long-sleeve t-shirts, and it didn't make sense to pair those nice warm fleece PJ pants with a short-sleeve shirt.

One night, I got the idea to make a long-sleeve shirt by sewing fleece "sleeves" onto a short sleeve shirt. The result...

Photobucket

Cute? Hideous? I'm still not entirely sure. But certainly, these shirts were fast and easy to make, cheap (I used leftover fleece scraps and standard Hanes boys underwear shirts, which I bought at Wal-mart for around $6 for a 5-pack), and very soft and warm!

I ended up making three shirts in this way last winter. We pulled them out again a few months ago as the weather started to cool off, and Littles has worn one of them just about every night since. A few nights ago, they were all in the wash, and Littles was very upset begging for a "soft shirt." We tried giving her some other shirts that are soft, but no, no. She wanted a cute/hideous fleece-sleeved "soft shirt."

So I got to work. And I took pictures this time to show how I put these together.

I start by taking a few key measurements. First, I need to know what length the sleeves must be. I do this by measuring an existing shirt -- or, in this case, one of Noob's onesies. It's about 7" from the shoulder seam to the cuff.

IMG_0209

Since the sleeves of the short sleeve shirt will stay somewhat intact, I need to get some measurements from it, too. This is hard to see, but it's the sleeve of the short sleeve shirt. It's about 1.5" from shoulder seam to cuff, and the hem is about 0.5".

IMG_0213

Now I can calculate how long my fleece sleeves have to be. They must be (total sleeve length) - (short sleeve shirt's shoulder seam to cuff length) + (short sleeve shirt's hem length * 2) + (desired hem length for fleece sleeve). Here, that was 7" - 1.5" + 0.5" *2 + 1" = 7.5"

As for how wide, the fleece sleeve needs to match the width of the short sleeve shirt's sleeve, so I need to measure that. Here, it's about 3.5". I'm going to use a 0.25" seam allowance, so that means that the fleece sleeve needs to be 3.5" * 2 + 0.5" = 7.5" wide.

IMG_0210

So I cut two pieces of fleece with those dimensions. I folded each piece in half to create a tube.

I also prepared an embellishment. This shirt will go along with Noob's Dallas Cowboys PJ pants, so I cut a Cowboys helmet out of some fleece. (The same thing I used to embellish his sleep sack.) I've also used t-shirt transfers in the past, but they get all cracked and yucky-looking over time. Fleece is much more durable.

The shirt is a Gerber size 18 months shirt. Gerber stuff runs really small, so Noob has been wearing this since he was about 3 months old. I got it at a thrift store for about 50 cents. I've been looking and looking for plain white short-sleeve infant shirts like this in regular stores, but I haven't found any! Too bad. They are so versatile.

IMG_0214

I started by sewing the helmet on to the front of the t-shirt. Then I started to work on the sleeves.

I folded the fleece in half, right sides together, and sewed up the open side. Fleece is much stretchier in one direction, so I made sure that the stretchiness was going across the width of the sleeve. That is, the open ends of the fleece tubes stretch more than the side I sewed up.

I turned the tube/sleeve right side out and the t-shirt inside out. I inserted the fleece into the t-shirt sleeve, right side to right side, and pinned it into place:

IMG_0216

Then I sewed the sleeve into place. I think it looks best to sew right around the original seam line on the shirt sleeve. That way, you don't see the original hem line just above the new seam when you're done.

Here are both sleeves finished. You can see the navy blue thread that I used, right near the original seam line. On the bottom sleeve, I've also trimmed the seam allowance:

IMG_0217

Then I hemmed the bottoms of the sleeves. You could actually leave the raw edges if you wanted; fleece doesn't fray.

All done!

IMG_0218

Here's how it looks! (Please ignore the strawberry yogurt all over the front. I should have done the photo session before breakfast.)

IMG_0292

IMG_0280

(Yes, he's wearing his Mini Mocs. They go well with these PJs!)

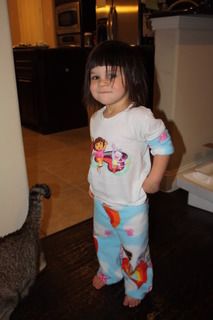
Here is Littles modeling another "soft shirt."

IMG_0186

I got the t-shirt for this one through a co-op that I'm part of. The co-op organizer found an amazing deal on toddler t-shirts -- it worked out to be about $1.50 a shirt including shipping and everything, so basically the same cost as the underwear shirts at Wal-mart. But these shirts are much higher quality and come in colors. I had this yellow shirt in mind specifically to match these yellow Pooh PJ pants. I also picked up a bunch of pink and blue shirts so that I have them on hand for future projects!

IMG_0197

(Yes, those are Mini Mocs on her feet, too! That's a pair that I made a while ago. They are made entirely out of pink fleece, no other materials.)

Littles loves her new "soft shirts." I'll probably make more of these before winter is through!