Showing posts with label 1 year old. Show all posts

Tuesday, August 30, 2011

Fleece: Are you ready for some football?


IMG_8495

Ah, fleece. If you've been following my blog from the beginning, you know that "fleece" was the most-used tag in my tag cloud for quite a while. Then summer in Texas hit... and fleece is not exactly my fabric of choice after 64 days (and counting) of temperatures over 100 degrees.

But we've been preparing our house to put it on the market, which has entailed a major clean-up of my sewing room. And oh my goodness, I have a lot of fleece. Mostly from the great Joann's remnant bin sale late last year. So, my goal over the next few months is to sew a lot of it up.

With football season right around the corner, I figured I'd start with some football-themed items. Starting with the fleece shorties shown above on Noob. Here's the back:

IMG_8504

As I've mentioned previously, I'm an Eagles fan and Hubby is a Cowboys fan. Not surprisingly, Cowboys fabric is easy to find here in Dallas, but I had to order this Eagles fleece online. Well worth it, though. I love how these shorties turned out.

I put in a "hammock-style" extra layer in the wetzone, which allows me to use these directly over non-waterproof diapers, such as prefolds. The extra layer is just a strip of fleece, to provide extra protection from wetness. It makes for really easy diaper changes when we're hanging out at home. Here's what the inside looks like:

IMG_8513

I didn't make this shirt -- my parents bought it for Noob. But it makes for a nice set!

IMG_8446

Of course, Hubby would never let me get away with sewing Eagles stuff but not Cowboys stuff. And anyway, I have Cowboys fleece coming out my ears. So I sewed not one but two Cowboys soakers. Again, these are intended for use directly over a non-waterproof diaper, such as a prefold -- but they are also just cute and fun for wearing around the house!

I used embroidered fleece on the first one and it turned out OK, but I don't really like the partial star on the back:

IMG_8429

IMG_8419 IMG_8425

The second one turned out just about perfect! I thought I had some action shots of Noob wearing it, but I guess not. Too bad, because it's so cute! And that is a high compliment coming from an Eagles fan :)

IMG_8516 IMG_8517

Finally, a soaker that Hubby and I can both approve of:

IMG_8514 IMG_8515

IMG_8533

A couple of specifics for these projects:

  • I used the Katrina longies pattern to make the shorties, and the Katrina soaker pattern for fleece to make the soakers. They are all size large.
  • As I mentioned, I did a hammock-style extra layer in the shorties. For the soakers, I used an extra wetzone layer.
  • I tried one of the soakers a few nights ago over a fitted diaper, and it held up great!
  • The contrasting waistbands and leg cuffs all came from fleece from Joann's remnants bin. The remnants bin is a perfect place to look for contrasting fleece, because you only need a small amount (about 4") to make waistbands/leg cuffs. So it's easy to find for super-cheap in the remnants bin.
  • These sew up fast. Less than an hour from cutting to done. And I am not a fast sewer, by any stretch of the imagination.

I'm sure there will be many more fleece projects to come, so stay tuned :)

Sunday, July 24, 2011

Birthday gifts

On Saturday, we attended a joint birthday party for "J," age 3, and "D," age 1. Two different families, but we (along with many of the other invitees) are very close with both of them, so it was wonderful being able to celebrate together!

Both families also happen to have a place of significance in my sewing "life." I wanted to sew gifts for both boys to commemorate that.

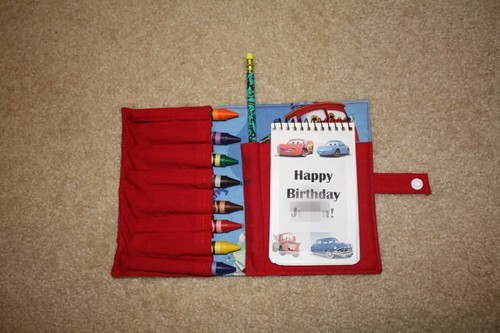
J's mom was the one who lent, and eventually sold, her sewing machine to me when I first got started. For J, I made a crayon wallet. I first heard of crayon wallets back in May, from one of my other friends, who had purchased some off Etsy for her kids and nieces. It seemed like the kind of thing that someone would write a tutorial for, and sure enough, some quick web searching turned up this tutorial.

It seemed a little tricky, but the blogger insisted over and over that it really wasn't that hard, so I took her word for it. Indeed, it really isn't hard at all! Once you get started, it quickly becomes clear how it all fits together.

I know that J loves anything with wheels, so I chose a Cars print for him. I actually got both types of fabric (the blue Cars fabric and the contrasting red fabric) at Walmart, of all places! My Walmart recently got rid of their bolts of fabric, but they do have an entire wall of precut 2 yard cotton pieces, including lots of Disney licensed stuff, for fairly reasonable prices ($6 for solids, $8 for licensed prints). I didn't have time to make it out to Joann's, so this worked out well.

The finished product:

IMG_7464

The outside, unfolded:

IMG_7466

Inside. The pad of paper is from Target, and then I taped on a cover that I made using Cars clip art that I found online:

I love how this turned out and will probably make more of these for future birthdays and other events.

On to D's gift. D's mom is a Texas A&M grad (yes, this is the same D for whom I made an A&M sleep sack as a Christmas present), and D is also the only other cloth diapered baby I know. Now, early last year, immediately following Noob's birth, I really wasn't doing a lot of sewing. I just wasn't into it, with everything else going on. But when D's baby shower rolled around, I decided to sew some A&M wetbags as a gift. That project is what really got me started on sewing again -- and I haven't stopped since :) I recently came across the leftover A&M fabric from the wetbags and decided to use it to sew -- what else? -- a diaper!

The fabric is cotton, so I didn't want to use it directly over a layer of PUL (to prevent wicking issues) and I also knew that D's parents don't use fitteds. I decided to try a pocket with embellished tabs, as I've heard that even cotton works fine on those tabs, since they don't really get wet.

I used the Darling Diapers Unlimited pattern, size medium. I've shown off embellished-tab diapers I've made using this pattern in the past, but here are some pictures for how I actually altered the pattern to do it. I took the idea from this Diaper Sewing Divas tutorial (free registration required), but that uses the La Di Da pattern. For DDU, I followed the same directions to cut off the wings at the line connecting the elastic endpoints (marked by stars):

IMG_7448

And I did the same for the wings:

IMG_7449

The LDD tutorial talks about trimming the little "tail" that you get when you put the tab pattern on top of the body pattern. For DDU, there are two little "tails" that need to be trimmed, one on top and one on the bottom. See them here?

IMG_7450

Final tab pattern with both tails trimmed:

IMG_7451

I traced the tab pattern onto vinyl. This allowed me to position the pattern just right on the fabric, because I could see through the pattern. Do you see the shiny vinyl on top in the picture below? The blue dots mark the snap placements (for both a single row and double row of snaps):

IMG_7452

Once I have the tabs cut out, I sew them to the body, then proceed with diaper construction as usual.

The final product:

IMG_7461

I didn't get the logos placed on the tabs quite as well as I would have liked, but I think it looks OK still!

IMG_7462

Inner is suedecloth with a modified welt pocket:

IMG_7460

Insert is a Zorb II trifold with serged edges:

IMG_7459

Folded up for stuffing into the pocket:

IMG_7458

I hope the recipients enjoy these gifts as much as I enjoyed making them!

Thursday, May 26, 2011

Another diaper

Here's what I sewed up last night. No action shots, as I didn't have time, and now we're leaving for the long weekend.

Very Baby Basic AIO pattern. This is a "medium long" size (see tips) -- basically, I added about 2" to the rise of the medium pattern. Outer is the same camouflage knit that I used on my last diaper. Hidden layer of bamboo fleece inside. Inner is suedecloth from Joann's. Soaker is a layer of bamboo fleece and a layer of suedecloth.

IMG_3940

Crossover aplix tabs:

IMG_3941

IMG_3943

Suedecloth is stay dry, so I'm hoping this will make a good overnight diaper. I'm just a little concerned because synthetic materials like suedecloth tend to hold onto stink more than natural fibers like bamboo. We'll see how it goes!

While I didn't take pictures, I did try this on Noob briefly this morning, and it seemed to fit well. Definitely a higher rise than the regular medium size, so no fear of plumbers crack :) But the waist is still a little bigger than I'd like, especially considering that Noob is towards the top of the listed weight range. Maybe when I get back from our weekend trip, I'll experiment with adding a few inches to the rise of the small pattern, to see if that gives me something that's long enough in the rise without being so big in the waist.

Monday, May 23, 2011

Camouflage

Fabric.com has free shipping for orders over a very reasonable $35, so I usually throw some extra fabric into my order to get to that threshold. As part of my recent order that included the "Army Strong" fabric and the fabric for another project (which I'm still working on and will show off in a few weeks here), I threw in some extra knits that were on sale. One was a camouflage print that I thought Hubby would like almost as much as "Army Strong."

IMG_3838

This is the Very Baby Basic AIO pattern again, size medium. I've realized that the medium size is just a little short for Noob in the rise -- it works OK for now, but I know he'll outgrow it pretty soon. So I'm currently experimenting with a "medium long" size, which is the same width with a longer rise. But I wanted to sew up one more medium using this camo fabric, to see how it fit. It is stretchy, and stretchy fabrics generally fit a wider size range.

I also wanted to try snaps, to see if the stretchy fabric made it easier to get a good fit with snaps. The Basic AIO pattern only comes with markings for aplix, but there are instructions on this page for making it with snaps instead. I opted to add the snaps prior to sewing the diaper, so that the snap caps wouldn't be exposed on the diaper interior. That also made it pretty easy to get the snaps lined up fairly straight.

By the way, that tutorial calls for three snaps on the wings, just like the Darling Diapers Unlimited pattern. I had complained about that when I sewed a DDU with snaps, but now I realize that the third snap is to prevent wing droop. It works well!

I did crossover snaps to allow the diaper to fit smaller waists. This is covered in the tutorial linked above:

IMG_3839

Diaper front, fully unsnapped. I forgot to make the bottom row of snaps one snap shorter than the top row. No biggie; that last snap just won't ever get used. Actually, I don't think the last two snaps on the bottom row will ever get used.

IMG_3841

Diaper inner. Bamboo velour with a hidden layer of bamboo fleece. See how the snap caps are not visible on the inside front of the diaper? The soaker is a layer of bamboo velour and a layer of bamboo fleece, trifolded. I made this soaker a little longer than the one I did on the Army Strong diaper (it's 14" long by 12" wide, compared to 12" by 12" for the Army Strong soaker) because I've found that the Army Strong soaker is a little shorter than I'd like once the diaper is put on.

IMG_3840

Action shots. You can see that the fabric really does stretch to cover Noob well in the rise:

IMG_3859 IMG_3846

I also like how the stretchy fabric helps the snaps fit right. Snapping diapers normally bug me, but this one doesn't. Although I will say that Noob is towards the top of the medium size's listed weight range (range is given as 15 lbs to 25 lbs, and he is 23 lbs right now) and he is on the crossover snaps -- the fabric stretches that much. I'm not sure this will fit a baby who is lower in the weight range. If I make one of these out of stretchy fabric again, I may shorten the wings a little bit, so that it will fit skinnier babies.

IMG_3860 IMG_3842

I've been working on another project with camouflage material. I got blue camouflage fleece to help "pad" another fabric.com order, so I decided to sew Noob a pair of pajama pants. I normally use the Katrina longies pattern to do this, but it's really cut to fit over big cloth diapers, and I have some upcoming projects where I need to sew pants for non-cloth diapered babies. I already have the McCall's 5963 pattern (it's what I used to make those awful footed PJs), and it includes a pants pattern, so I gave it a whirl. I made a size large, which is listed as fitting 22-25 lbs.

IMG_3813

It seems to be really big, especially in the rise, but it matches up almost exactly with a pair of Carter's (store-bought) knit pants in 18 month size (on the left). It's bigger than Katrina pattern size mediums (on the right), but that makes sense, since Noob has really outgrown that pair of longies. You can see how the rise on the longies matches the rise on the new pants, even though the longies are made to fit a smaller baby:

IMG_3887 IMG_3890

Action shots over a prefold (pretty close to disposable diaper trimness). They are a little baggy, but they don't fall down, which is my main concern!

IMG_3897 IMG_3905

But they are easily big enough to work as pajama pants over a seriously fluffy bum. In these pictures, Noob is wearing the pants over the wool soaker from this post and the camo diaper. This is bulky, but it's a bulletproof overnight setup! The diaper is absorbent enough and the soaker is thick enough that I would be shocked if anything leaked out, but if it did, the pajama pants offer yet another layer of protection.

IMG_3864 IMG_3874IMG_3883

I always like to mention that the fleece pajama pants "trick" works with disposable diapers, too! I know a lot of people struggle with their kids leaking out of disposable diapers overnight. Putting a pair of fleece pajama pants like these over a disposable diaper can help keep the sheets dry in case of leaks.

Anyway, there you have it! My camouflage projects! I still have plenty of both fabrics left over, so I'm sure you'll see it again. I'm a little bit worried about the quality of both -- the diaper is already fading a little and the pants have some noticeable pilling after just one wash. Hopefully, they won't continue to age that quickly.

Saturday, May 14, 2011

Army strong

I saw this diaper at the Goodmama stocking last week. Hubby is former Army National Guard, so I knew he'd love it:

Goodmama Army Strong

If you're not familiar with Goodmamas, they are the height of insanity in the cloth diapering world. For starters, they start at $35 new, with some selling for over $60. Yes, for something designed to catch your kid's poop. Then, some of the outer fabrics are made in very small quantities, so those diapers become collector's items, for lack of a better term, and can sell for ridiculously high prices. I think the highest I've ever seen was $215. Again, for something designed to catch your kid's poop.

The funny thing about all of this is that the fabrics used are nothing special. I found this particular one (well, the tan version) on fabric.com for less than $10/yard. A few hours of work and I had this:

IMG_3688

Back:

IMG_3689

Entire outer. This is the Very Baby Basic AIO pattern again:

IMG_3695

The inner has a hidden layer of bamboo fleece and then a layer of yummy soft bamboo velour, both from Nature's Fabrics. The snap-in soaker is a layer of bamboo fleece and a layer of bamboo velour, trifolded.

IMG_3694

I made a matching shirt as well! I took one of the onesies I bought during the Babies R Us clearance that I mentioned a while back. It is Gerber 24-month size, but since Gerber runs small, it's closer to 18-month size or even a large 12-month size. I don't really like onesies with cloth diapers, so I cut it off just above the leg holes and hemmed it to turn it into a regular t-shirt. Then I cut out some small pieces from the Army fabric, folded under the edges (the fabric is woven, so unfinished edges do fray), and sewed them down.

Front:

IMG_3690

IMG_3690

Back:

IMG_3692

IMG_3692

Action shots:

IMG_3697IMG_3701IMG_3727

I love how this turned out! And it was much faster than waiting up to 2 months for the Goodmama version to ship! (Not to mention the fact that I have enough fabric left for probably three more of these sets... :)