Showing posts with label cloth diaper inserts. Show all posts

Sunday, July 24, 2011

Birthday gifts

On Saturday, we attended a joint birthday party for "J," age 3, and "D," age 1. Two different families, but we (along with many of the other invitees) are very close with both of them, so it was wonderful being able to celebrate together!

Both families also happen to have a place of significance in my sewing "life." I wanted to sew gifts for both boys to commemorate that.

J's mom was the one who lent, and eventually sold, her sewing machine to me when I first got started. For J, I made a crayon wallet. I first heard of crayon wallets back in May, from one of my other friends, who had purchased some off Etsy for her kids and nieces. It seemed like the kind of thing that someone would write a tutorial for, and sure enough, some quick web searching turned up this tutorial.

It seemed a little tricky, but the blogger insisted over and over that it really wasn't that hard, so I took her word for it. Indeed, it really isn't hard at all! Once you get started, it quickly becomes clear how it all fits together.

I know that J loves anything with wheels, so I chose a Cars print for him. I actually got both types of fabric (the blue Cars fabric and the contrasting red fabric) at Walmart, of all places! My Walmart recently got rid of their bolts of fabric, but they do have an entire wall of precut 2 yard cotton pieces, including lots of Disney licensed stuff, for fairly reasonable prices ($6 for solids, $8 for licensed prints). I didn't have time to make it out to Joann's, so this worked out well.

The finished product:

IMG_7464

The outside, unfolded:

IMG_7466

Inside. The pad of paper is from Target, and then I taped on a cover that I made using Cars clip art that I found online:
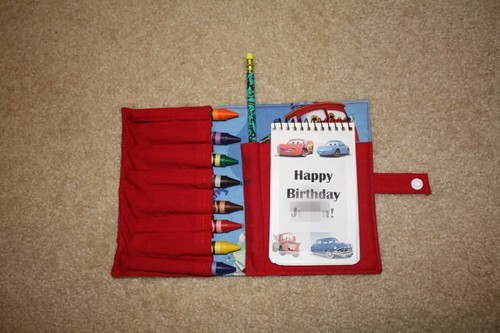
I love how this turned out and will probably make more of these for future birthdays and other events.

On to D's gift. D's mom is a Texas A&M grad (yes, this is the same D for whom I made an A&M sleep sack as a Christmas present), and D is also the only other cloth diapered baby I know. Now, early last year, immediately following Noob's birth, I really wasn't doing a lot of sewing. I just wasn't into it, with everything else going on. But when D's baby shower rolled around, I decided to sew some A&M wetbags as a gift. That project is what really got me started on sewing again -- and I haven't stopped since :) I recently came across the leftover A&M fabric from the wetbags and decided to use it to sew -- what else? -- a diaper!

The fabric is cotton, so I didn't want to use it directly over a layer of PUL (to prevent wicking issues) and I also knew that D's parents don't use fitteds. I decided to try a pocket with embellished tabs, as I've heard that even cotton works fine on those tabs, since they don't really get wet.

I used the Darling Diapers Unlimited pattern, size medium. I've shown off embellished-tab diapers I've made using this pattern in the past, but here are some pictures for how I actually altered the pattern to do it. I took the idea from this Diaper Sewing Divas tutorial (free registration required), but that uses the La Di Da pattern. For DDU, I followed the same directions to cut off the wings at the line connecting the elastic endpoints (marked by stars):

IMG_7448

And I did the same for the wings:

IMG_7449

The LDD tutorial talks about trimming the little "tail" that you get when you put the tab pattern on top of the body pattern. For DDU, there are two little "tails" that need to be trimmed, one on top and one on the bottom. See them here?

IMG_7450

Final tab pattern with both tails trimmed:

IMG_7451

I traced the tab pattern onto vinyl. This allowed me to position the pattern just right on the fabric, because I could see through the pattern. Do you see the shiny vinyl on top in the picture below? The blue dots mark the snap placements (for both a single row and double row of snaps):

IMG_7452

Once I have the tabs cut out, I sew them to the body, then proceed with diaper construction as usual.

The final product:

IMG_7461

I didn't get the logos placed on the tabs quite as well as I would have liked, but I think it looks OK still!

IMG_7462

Inner is suedecloth with a modified welt pocket:

IMG_7460

Insert is a Zorb II trifold with serged edges:

IMG_7459

Folded up for stuffing into the pocket:

IMG_7458

I hope the recipients enjoy these gifts as much as I enjoyed making them!

Tuesday, July 12, 2011

Diapers for traveling: More serging practice

We're on our long-awaited vacation to Panama! I wanted to bring mostly Best Bottoms along on this trip, because they take up a lot less space than the diapers we usually use. Here are four Best Bottoms diaper changes (a shell with an insert + 3 additional inserts) on the left, next to four of our normal BumGenius diapers on the right:

IMG_5967

I have one Best Bottoms shell (the brown one shown above) and had worked out a trade for two more, but unfortunately,the woman I was trading with goofed, and didn't send out the other two shells until just this week -- too late for this trip. Oh well, I'll have them for our next vacation, to Florida in September. In the meantime, I really needed at least one more shell for this trip, so I made one, using the Darling Diapers Unlimited pattern, size medium. The exterior is a 100% polyester print, and the interior is PUL, sewed so that the "shiny" side is exposed so that it can be wiped clean if it gets dirty:

IMG_7113

IMG_7117

I added snaps to the interior to secure the Best Bottoms inserts. I meant to do it before sewing the diaper together so that I could hide the snaps, but I forgot, so I had to do them so that they're exposed on the diaper exterior, as you see above. Here is a shot of the interior, alone and then with a large size insert:

IMG_7114IMG_7116

The sizing of the shell isn't quite right: It's a little too long for medium size inserts, and a little too short for large size inserts. It's also a little wider than it needs to be. I doubt I'll sew another one of these, but if I do, I'll either shorten or lengthen the rise slightly (depending on whether I want to use medium or large inserts with it), and I'll use the DDU pattern without color sides, rather than the pattern with color sides. But we've been using this shell for the past few days on our trip and it is perfectly functional. And really cute, and soft! I have tons more of that dino print (I got 2 yards of it for just $3, from a destash at Top Shelf Fabrics!), so I'm excited to make some other stuff with it.

I also needed more inserts to go with the shells, so I got a lot more practice serging. I'm really starting to love it! It is so much faster than sewing. I made all of these inserts the night before we left, after the kids went to bed, and while packing for the trip -- that's how quickly they come together, thanks to the serger:

IMG_7112

The top four are regular inserts and the bottom four are overnight inserts (with snaps on both sides). There is one medium size and three large size inserts of each type. The regular inserts are 3 layers of either bamboo fleece or bamboo/hemp fleece topped with 1 layer of bamboo velour. The overnight inserts are four layers of hemp fleece. All the fabric is from Nature's Fabrics. I made one more the night before the trip, which isn't pictured -- it's 3 layers of bamboo/hemp fleece topped with a layer of suedecloth for a stay-dry feel.

With that number of layers, the regular inserts aren't quite as absorbent as I'd like on their own. They do last about 1-2 hours on Noob, and it's nice having the option to add an overnight insert underneath if I need more absorbency.

These aren't the greatest pictures, but here are some action shots of the shell with a large size insert inside. It's not as trim as the real Best Bottoms shell, but it's fine:

IMG_0841IMG_0852

Thanks to all this work, I'm feeling a lot more comfortable with my new serger now. Maybe even comfortable enough to try some "real" serged projects when we get home!

Monday, July 4, 2011

Adventures of a rookie... serger?

My birthday was last week and my parents got me a serger! (A Brother 1034D, to be specific, which comes highly recommended at the lower end of the serger price range.) It's a fancy type of sewing machine that cuts, sews, and finishes edges, all in one step, so it can really make sewing a lot faster!

The timing could not have been better, as I need to make a bunch of inserts for Noob's Best Bottoms shells in preparation for an upcoming trip, and inserts are way faster to sew with a serger. As it turns out, inserts are also a perfect first serging project. They sew up quickly, so if you totally mess up, it's not like you've wasted a ton of time. You don't have to be super-precise about sewing the exact right shape; you just have to get in the ballpark. And since the Best Bottoms inserts have contoured edges, rather than being perfectly straight, it gave me some excellent practice sewing some (very gentle) curves, which is definitely tricky on a serger.

Bonus: They actually turned out usable. Here is the first batch I made.IMG_5970

They are five layers of flannel, which is not a whole lot. But I got this flannel for cheap, and it was great practice. Here is one of the inserts inside a Best Bottoms shell. I love how trim this system is. If you haven't seen it before, definitely check out this page, which explains what it's all about. It's pretty clever, easy to use and very economical.

IMG_5971

Then I moved on to using old t-shirts. Even cheaper! And I took pictures.

First, I folded the shirt into fourths. This gave me a total of eight layers:

IMG_5977

I laid an insert on the t-shirt, making sure that it wasn't covering the shoulder or neck seams. Then I traced it, using a disappearing ink marker so that I wouldn't ruin the original insert:

IMG_5978

When I was done tracing, I pushed down on the snaps on the insert. This left little indentations on the shirt, so I would know where to add snaps:

IMG_5979

I cut around the inset. This doesn't have to be precise, because as you'll see, the serger will take care of any excess. You can also see here that I've circled where the snaps need to go:

IMG_5980

I added the snaps, through the bottom two layers of the insert. I wanted to make this one into an "overnight" insert, which has snaps on the bottom (to snap into the shell) and on the top (to snap in a regular insert, giving double absorbency). So I flipped all the layers over and circled where the other snaps are:

IMG_5981

Then I added the snaps. I did sockets on one side (to allow the regular insert, which has studs, to snap in) and studs on the other side (to snap into the shell). Here are my layers with the snaps added... ready to serge!

IMG_5998

All done serging! Ready to use! You can see that the serger cut off all the excess fabric -- so easy! This took all of about 15 minutes from start to finish, including taking pictures :)

IMG_5999

Here's how it looks with the shell. Overnight insert (with snaps on both sides) on the bottom, regular insert on top. I made the regular insert out of a t-shirt as well and accidentally left a layer with some writing on it on top... oops! Still works fine, just looks funny :)

IMG_6001

IMG_6000

Here's how it looks on! Still pretty trim considering this is a full 12 layers of fabric.

IMG_6044

I love my new toy :) Hopefully by the time I'm done sewing all the inserts I need, I'll feel confident to try it out on some "real" projects!

Saturday, April 2, 2011

Quick and dirty diapering projects

The kids and I were out late tonight watching Hubby play hockey, so once I finally got them to bed, I didn't have a ton of time to sew. So I just worked on some easy diapering items.


First up was a new wetbag. I only have two medium-size ones (holding about 3-4 diapers) for use in the diaper bag, and it never seems to be enough, so I've been wanting to make some more. For the body of the bag, I used some sandwich PUL from the Swaddlebees clearance area. I had ordered a yard of this PUL to make diapers, and they threw in an end cut of a slightly different print for free. It's only about 14" wide, not enough to make a diaper, but perfect for a wetbag. And since it has a cute print, I could just do a simple single-layer wetbag, rather than doing an inner PUL layer/outer print layer like I usually do.


IMG_2091


I got the zipper from my new zipper stash :) Since I've been sewing a lot of wet/dry bags, sleep sacks, etc., I keep having to buy zippers, at $2 apiece or more. The zippers sometimes cost more than the fabric! That was starting to annoy me, so I went on eBay and bought a lot of 100 zippers for $27, including shipping! All different colors and lengths. Obviously a lot cheaper, even if I don't end up using every one of them. Plus, it's nice just having them there for when I feel like sewing something with a zipper!


IMG_2091


Anyway. The sewing was super easy. I just sewed in the zipper (using a method similar to the wetbag tutorial I always use, except with just one layer) and then sewed down the two sides. Done!


The bag is a little ugly on the inside, as you can see raw seams and the tails of the zipper tape. (Normally, all that stuff is hidden in between the inner and outer layers of the wetbag.) But it's functional, and the price is right!


IMG_2095


Once I finished that up, I worked on a "fake pod" for my Softbums Omni diaper. The Omni is pretty nifty... truly one-size (by means of a unique toggle elastic system), and it can work as either a pocket diaper (by inserting the "pod," or insert, into the pocket in the diaper) or as an all-in-two (by snapping the pod into the body of the diaper). I only have one shell and one pod, so I'm not really able to use it as an all-in-two right now -- I can't use the shell more than once. But I figured it wouldn't be too hard to sew my own pods.


I got some bamboo velour and bamboo fleece from Nature's Fabrics, and prepped it by washing it on hot 4-5 times. (I just threw it in with my whites whenever I did a load.) Real pods are 3 layers of bamboo fleece and one layer of bamboo velour, but that makes it really thick and Noob doesn't need all that absorbency, so I decided to use just two layers of bamboo fleece. I traced the shape of the original pod onto the fabric, then cut around it with a generous seam allowance.


I layered the fabric as follows: bamboo velour right side up, first layer of bamboo fleece right side down, second layer of bamboo fleece (doesn't matter what side is up). Then I sewed on the tracing line, turned the new pod, and topstitched all around. Finally, I added a snap socket at the top of the new pod, for snapping in to the Omni shell when using it as an all-in-two.


The result is an almost perfect copy of the original pod. In this picture, the original pod is on the left, and my copy is on the right:


IMG_2089


It fits nicely in the Omni shell:


IMG_2090


I'll try it out tomorrow and see how it performs!