Thursday, February 23, 2012

The final stash of stupid cloth training pants (now even stupider, thanks to Noob!)

I finally finished the last two a few days ago. Here's all of them (minus one, the white one with the stars on the tabs, shown in this post -- it was still at school):

IMG_4461

Closer up... the one on the left here is one of the two new ones, and the one on the right I made a few weeks ago. Same PUL -- you can see how it's faded with washing in the one on the right. But it doesn't look too bad when it's not side-by-side with a brand-new one :) These both have microchamois tabs and microfleece inners.

IMG_4463

The one on the right here is another new one. "Later Gator" PUL print body, ribbed knit tabs (from Joann's), microfleece inner:

IMG_4465

The one on the right here is the second one I sewed, but I never posted a picture of it. It's the one with crushed panne tabs/inner, before I decided crushed panne was too much of a PITA to work with :)

IMG_4466

I've posted all of these before, but just to do close-ups...

IMG_4464

IMG_4467

IMG_4468

IMG_4470

IMG_4471

So of course, now that I'm done sewing these, Noob has stayed completely dry at school for much of this week! LOL! That is why I didn't buy these suckers at retail prices! I'll keep some around for naps/nighttime, for sure, and I'm just trying to decide if I should save the rest for Q (since it's a pretty boyish stash, and Q may or may not be a boy) or sell them off...

Tuesday, February 21, 2012

Noob's nap mat

One of my earliest posts on this blog was about a nap mat that I made for Littles to take to preschool  It worked perfectly! She ended up using it until just a few months ago, when we stopped having her nap at school.

Between first trimester fatigue, the holidays, our China travels, and sewing Noob's training pants stash, I didn't have time to make a nap mat for Noob before he started preschool, so he's been sleeping on Littles' mat. But pink ballerinas aren't really "him," so I always planned to make him a new mat as soon as I had some time.

Let the record show that I originally planned to make this using a bunch of fleece from the great Joann's remnant bin sale of about a year ago, since I really need to use it up! But Noob is obsessed with trains as of late, so just before I started sewing the mat, my husband said, "Hey, why don't you do a train theme?"  That meant scrapping the remnant bin fleece I had gotten for cheap and had around the house in favor of buying expensive licensed Thomas the Tank Engine fleece (since, oddly, it's very hard to find train fleece that does not feature Thomas) -- but what can I say. My husband made me do it!

I made this in basically the same way that I did Littles' nap mat (documented extensively in the other post), with a few minor changes, which I'll get to later. The end result...

IMG_4416

Bottom of the nap mat and straps: Royal blue fleece (I was able to use some from the great remnant bin sale here)

Top of the nap mat: Flannel

Pillowcase: Thomas the Tank Engine woven cotton. (I got this a while back as part of a bigger fabric order, figuring I'd find some use for it!) I used my serger on this, rather than doing French seams like I had to do on Littles' nap mat in my pre-serger days -- sooooooooo much faster.

Blanket: Thomas the Tank Engine fleece, from Joann's

Here's a close-up of the pillow and top of the blanket. I made the blanket a little longer than I did with Littles', so it can come up and over the pillow a bit. But I didn't attach it to the side of the nap mat at the top, so it can fold down, as shown here (and above).

IMG_4418

Rolled up...

6919787591_bdb8d9d9c3_b

The light blue piece is a shoulder strap -- a new feature I added on this one. It's just a single layer of fleece, about a yard long. I thought that might be too short, but if anything, it's too long. It's very thin, by design: It lies under the mat when it's unrolled, so I didn't want there to be a big bump when Noob lay down. I don't love it, but it works OK for now, and it'll be easy enough to cut off in the future if I decide I really hate it.

Close-up of the name tag:

6773669488_c2ffff4400_b

The light blue is fleece again. Gahhhh, this picture makes it look like the edges are really crooked -- I promise they're not that bad in person. For the tag itself, I used printable fabric that I got on clearance at Joann's a while back. It's canvas material that you can stick in your inkjet printer and print on directly. It's not supposed to be washed, so we'll see if we remember to always unsnap the tag before washing :) If not, no big deal, it's easy enough to make another one of these.

By the way, the picture is of Noob riding on a high-speed train from Shanghai to Beijing :)

IMG_1596

Overall, not my best work. You can't really tell from the pictures, but I had serious trouble sewing straight lines, for some reason! So there are a lot of places where the mat is kinda cockeyed. But it's definitely usable, and most importantly, Noob loves it. OK, he might not look like he's loving it in these action shots, but trust me, he was super excited about his new "choo-choos."

WP_001049

WP_001048

Wednesday, February 8, 2012

More stupid cloth training pants :)

(See previous post for more information about these, including why I think they're stupid and why I'm sewing them anyway :)

IMG_3883

On the left:
Outer: PUL (wazoodle.com)
Tabs: camouflage polyester knit (fabric.com)
Inner: microchamois (purchased from a coop)

On the right:
Outer: PUL (purchased directly from another sewing mom)
Tabs: cotton rib knit (Joann's remnant bin)
Inner: microfleece (wazoodle.com)

Some action shots of the one on the right, which is one of my very favorites (love that shark print PUL!) and whoa, some serious bedhead:

IMG_3885IMG_3887

A few more...

IMG_4130

Left:
Outer: PUL (purchased directly from another sewing mom) -- this is a "happy tools" print that I've seen in a number of places, and I will note that it has faded slightly
Tabs: microchamois (purchased from a coop)
Inner: microfleece (wazoodle.com)

Middle:
Outer: PUL (purchased directly from another sewing mom)
Tabs: Cotton rib knit (Joann's remnant bin)
Inner: microfleece (wazoodle.com)

Right:
Outer: PUL (purchased from the Swaddlebees outlet -- not available anymore)
Tabs: Cotton rib knit (Joann's remnant bin)
Inner: microfleece (wazoodle.com)

For the inserts, I did three layers of heavy bamboo fleece (purchased from a coop) again, but this time, I busted out some "fancy" multicolored serger thread. This is Gutermann brand bulky nylon, readily available at Joann's, and it looks awesome! I love it. It makes the inserts really easy to pick out in the dryer, too -- handy when I'm in a rush to get the diapers stuffed and ready for school in the morning. You only really need the fancy thread in the upper and lower looper; I used plain white thread for the left and right needle.

IMG_3882

Noob has been at school for two weeks now and these are working out well. The fit seems to be decent, as I've been home for five of the days he's been in school (I was out of town on business all last week) and he's only leaked one of those days. And that was actually because the insert was soaked, not due to fit. But I don't think that will be too much of an issue, as a single insert does seem to be plenty of absorbency for him as long as his teachers stay on top of diaper changes. Most of the time, he soaks less than half of the insert. (I can tell when I go to unstuff the trainers at night.)

I'm now up to 10 trainers, which is baaaaaaaaaarely enough for two full days -- he's there between 8-9 hours/day, and I typically send him over in one pair of training pants and then he gets 3-4 diaper changes during the day. I have two trainers more cut out and ready to sew, which should give me a little more breathing room in case he has an extra-poopy day or something.

Monday, January 23, 2012

Cloth training pants

Let me preface this post by stating that I think that training pants (cloth or disposable pull-ups) are the stupidest thing ever. LOL.

The idea behind them is that they provide a transition from diapers to underwear, allowing kids to use the potty but preventing messes when they don't. Which sounds great in theory. Problem is, at least with my kids, avoiding a mess is the reason that they use the potty. If they're in training pants, there's no motivation to use the potty. And so training pants are really no better than diapers.

For that reason, Littles went straight from diapers to underwear. And for that reason, when I work on potty training with Noob right now, he's bottomless.

Another thing that's stupid about cloth training pants in particular is that they are designed to be used for a limited period of time, when the child is transitioning from diapers to underwear. Presumably, the child should either "get" the concept of using the potty and transition to underwear, or not "get" it and go back to diapers. Either way, that eliminates the need for training pants. I can see how it might make sense to use a pack or two of disposable pullups during that transition period. But spending hundreds of dollars on a full stash of cloth training pants? That makes no sense to me.

So, why on earth am I sewing a full stash of cloth training pants? Well, Noob is starting at preschool this week, and his preschool requires pullups -- no diapers. So, I have to buy super-expensive disposable pullups, or spend hundreds of dollars on cloth training pants... or sew my own. Clearly, the last option won out :)

(If you're wondering what I did for Littles when she started at this preschool? Since I didn't know how to sew at the time, I found some cheap side-snapping diapers, and pre-snapped them so that they could be pulled on. After a few months, her teachers complained that she wasn't able to pull them up/down easily enough. Which was true. Luckily, she was on the verge of potty training anyway, so we switched her into underwear at that point and that was that. But given that Noob will have the same lead teacher, I knew that the side-snapping diapers wouldn't be an option this time around.)

Without further ado/ranting, here is my collection of stupid cloth training pants :) All are done using the Trimsies Trainer pattern, overnight style, size small, with a pocket.

IMG_1652

IMG_1654

IMG_1655

Outer: PUL (purchased directly from another sewing mom)
Tabs: Cotton rib knit (Joann's)
Inner: Microfleece (wazoodle.com)

I did just a slit pocket on this one. Very easy -- basically, I cut a hole in the inner fabric using my rotary cutter, before sewing the outer and inner together. But I don't like the way it looks. It kinda "flips up," exposing the Lastin elastic at the back. Still, it's very serviceable.

Noob wasn't really cooperating for action shots, but here are a few. For these, I was using a two-layer Zorb II soaker that I made a while back. It fit OK, but these trainers are really trim through the crotch/front panel, so I knew they'd look better if I sewed up some soakers from the pattern itself. Which I've done now... I'll get to those in a little bit. Anyway, you'll see a little bit of poofiness in the front because the soaker that's in there isn't the best fit.

IMG_1640IMG_1631

I wasn't quite sure that the side tabs were stretchy enough to be easy to pull up/down, and I thought it might be the microfleece inner limiting the stretch. So for the second pair I made, I used crushed panne velour for both the inner and the tabs, since it's super thin and stretchy. No pictures of this one, unfortunately :(

I found that the final product was just about as stretchy as my first version. And crushed panne is a maaaaaaaaajor pain in the butt to work with, because it's so thin and stretchy and slippery. It took me a lot longer to make, and since I have a lot of these to sew up in a short period of time, I decided to go back to microfleece inners.

Here are the next three that I made:

WP_000987

Inserts: These are made from the soaker pattern included with the trainer pattern. They fit great! They are three layers of heavy bamboo fleece (purchased from a coop). I originally thought I'd double them up, but I'm finding that just one is plenty absorbent! I'm loving this heavy bamboo fleece!

Top trainer outer: PUL (purchased from another sewing mom)
Tabs: Jersey cotton (from an old sheet set we have around the house, same one I used for the fitted diaper in this post)
Inner: Microfleece (wazoodle.com)

Middle trainer outer: PUL (fabric.com)
Tabs: Cotton interlock (naturesfabrics.com)
Inner: Microfleece (wazoodle.com)

Bottom trainer outer: PUL (purchased from another sewing mom)
Tabs and inner: Microchamois (purchased from a coop)

These all turned out really really well! We've been on vacation in China for the last ~2.5 weeks (which is why I haven't been sewing...) and I've used them all quite a bit and they've been working great. I especially love the bottom one with the microchamois tabs/inner -- microchamois is a type of microfleece that is slightly thinner and stretchier, and it really makes for a nice fit.

Oh! One thing I did on some of these trainers was sew a small patch of t-shirt fabric into the crotch. This is a feel-wet fabric (microfleece/microchamois are stay-dry), so hopefully that will help Noob with potty training. Here's what it looks like. Not real pretty on this trainer (it's obviously less visible on the trainers with white inners), but you can't see it once the trainer is on.

WP_000988

No action shots because I've been lazy, but I'm really happy with this pattern and these trainers. I have six now, which should be enough for one day at preschool... I'll be doing a lot of laundry at night until I can sew up a few more to add to the stash!

Friday, December 30, 2011

Completed Kindle cover

Here's what it looks like with the elastic (and Kindle!) on the inside:

IMG_1854

The elastic pieces are about 2.5" long, and they're placed about 1.5" from each edge. As soon as I sewed them on, my husband pointed out that the lower right elastic slightly blocks the power switch. Doh. Maybe about 1" from each edge (adjusting the length accordingly) would work better.

Thursday, December 29, 2011

Christmas gifts: Getting back on the wagon

I know, it's been way too long! But I've been busy... growing a person :) That's right, we're expecting our third baby in July! First trimester fatigue has hit hard this time around, and so my prime sewing time (after the kids are in bed) has become my prime sleeping time. But I'm getting out of the first trimester now and getting a little more energy, so I'm ready to get back on the sewing wagon!

This past week, I worked on a couple of Christmas gifts for my husband. The first one was a no-sew fleece blanket:
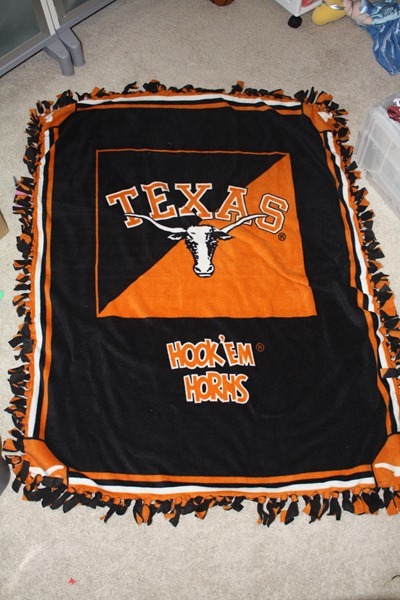
IMG_1768

I found the front panel on the red tag shelf at Joann's. The back is plain black fleece. These blankets are technically easy to make (and truly require no sewing), but they're somewhat time-consuming. You cut out a 4" x 4" piece from each corner, and then cut a 4" x 1" fringe all around the blanket. Then you tie a knot on each piece of fringe. That's the part that takes a while. My sewing room now doubles as my office (I guess it really should be the other way around, haha! :) so this was a perfect project to work on while I was stuck on conference calls!

Really, this panel would have worked better as a sewn blanket, if I had left on some of the fleece that originally bordered the design, as a seam allowance. See how the Longhorn logo in each corner gets kinda cut off in the no-sew version? I could have avoided that if I had sewn it. But I didn't realize that until after I had cut off the bordering fleece, and anyway, the Joann's lady cut the solid black fleece just big enough to match the panel, so I didn't really have any extra to work with on the back side. Oh well! It turned out fine anyway.

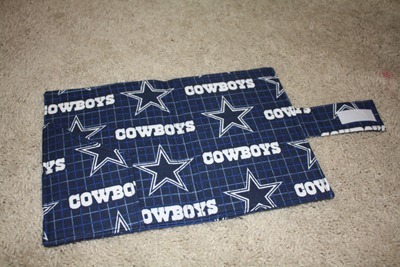
The second project was a cover for my husband's Kindle:

IMG_1769

Since I don't use a Kindle myself, I started off by asking some of my friends who have one what they liked about their covers. There were two big features that most of them liked:

  1. A pocket on the inside
  2. A cover that opens like a book and allows for reading without removing the Kindle (as opposed to a pouch/slipcover style)

I did some searching and came up with a bunch of tutorials. I ended up finding inspiration in this tutorial: http://sewlostforyou.blogspot.com/2011/01/kindle-cover-tutorial.html

But it used leather, while I wanted to use Cowboys flannel (left over from making Hubby's pajama shorts for Fathers Day). Leather is a lot thicker/stiffer than flannel, and it doesn't fray, so I had to make quite a few modifications to make my flannel "behave" more like leather.

I started with the closure strap. I used two layers of flannel for this, and put some lightweight interfacing on the wrong side of one layer for stability. Then I sewed the two layers together, turned, and topstitched. Finally, I added a small strip of velcro to the strap. Here's what it looked like when completed:

IMG_1754

As it turns out, it was way too long -- I'll get to that in a minute.

Then I did the inside pocket. For this one, I folded the flannel and cut an appropriately-sized piece, then added interfacing to the entire piece of flannel. So when I was done, I had two layers of flannel and two layers of interfacing. I cut it on a diagonal -- I totally eyeballed this, but it worked out well. If I were doing it again, I'd make the diagonal hit a little further down on the top edge of the piece of flannel. Anyway, you can see the rough dimensions here, about 7" x 4.5", minus that cutout.
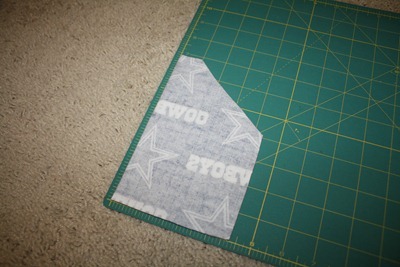
IMG_1757

I sewed along the top edge, the diagonal, and the non-folded edge (on the right in the picture above), leaving the bottom open for turning. I turned and topstitched around those three edges, leaving the bottom and the folded side un-topstitched.

Then I cut out the body pieces. I used the same dimensions as given in the tutorial mentioned above, but added half an inch to account for seam allowances, since I would be turning and topstitching. I think each piece ended up being 8.5" x 12". If I were doing it again, I'd add another half inch, and sew with a half inch seam allowance, just to give myself a little more room to work with.

I sewed the other strip of velcro to one body piece. This would become the outside cover.

I pinned the inside pocket to the other body piece, making sure to match up edges. This meant that the (still-open) bottom and the folded edge got sewn up when I sewed the body pieces together:

IMG_1758

Finally, I put the two body pieces together, wrong sides facing, and sandwiched the strap between them. In this picture, the outside cover is on top (you can see where the velcro is sewed down, on the left side in the picture below). I helpfully noted that the strap has the velcro tab facing down, towards the inside cover:

IMG_1756

I cut the strap way down! In the original tutorial, the strap goes all the way around the outside of the cover. Mine didn't have to go that far. I think it ended up being about 4.5 inches, with about an inch of that sticking out of the cover piece "sandwich," as you can see above.

Then I stitched the body pieces together, leaving a small opening for turning, at the top. Here's what it looked like after turning... outside:
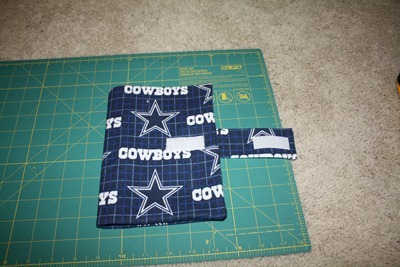
IMG_1760

And inside:

IMG_1759

I stuck two pieces of Peltex in through the hole I'd left for turning. (So, that hole should be at least 5" wide or thereabouts. Peltex is SUPER heavy duty interfacing. I had some left over from my failed attempts to make the collar for Littles' Halloween costume, so I was glad to find another use for it. Here's what it looks like inside the cover:

IMG_1762

You could also use headliner fabric if you wanted a softer/more padded case. But one thing I discovered in our big move is that I have a lot of fabric, haha. So my mission over the next few months is to sew out of my stash as much as possible!

OK, moving on. This wasn't in the directions for the original tutorial I was following, but I went ahead and fused the Peltex to the fabric, by putting a wet cloth on top of it and ironing.I figured that would keep it from shifting around.

Finally, I topstitched all around the cover body, which also closed up the hole for turning. And I sewed a couple of lines going down the "spine" of the cover.

Here's what it looked like when it was finished!

IMG_1770

IMG_1771

With something in the inside pocket, just to show it off, since it tends to get a little lost in the pattern.

IMG_1772

I do have one more thing to completely finish this off. I need to sew four strips of elastic to secure the Kindle in the cover. (Inspired by this tutorial.) I couldn't find Hubby's Kindle when I was working on this, and didn't want to ruin the surprise, so I gave it to him as-is and plan to add those strips now that I can make sure to get them positioned just right.

Now... Hubby got a new Kindle Fire for Christmas! And it fits well inside this cover, too. But he has some suggestions for some minor modifications, e.g. making the strap longer so that he can "stand up" the Kindle Fire when watching movies on it. So, he'll use this one for his original Kindle (which he's keeping) and I'll probably sew another one of these soon. It seems like a lot of steps but it's really not too hard, and should be even easier now that I've figured out the modifications I need to make to that original tutorial.

Sunday, November 13, 2011

Snow White costume

Yep, I'm still here.

I know I haven't posted in over a month. I've spent the last month 1) moving houses and 2) sewing Littles' Halloween costume. I think the first was more time consuming, but it's really a close call :)

Anyway, we're in the new house now, and good news! I now have a dedicated space for sewing :) (In the old house, my sewing area was in our guest room -- and we have guests frequently, so I had to take a sewing break or move my sewing stuff elsewhere on a regular basis. Not to mention the fact that guests had to find someplace to squeeze there stuff amidst all my fabric.) Bad news, I haven't had any time to set it up yet, so I'm still not sewing again. One of these days.

As for the Halloween costume, that did get finished, in time for the big day.

IMG_0795

For those of you who aren't intimately familiar with the Disney Princesses (lucky!), this is Snow White. The pattern is Simplicity 2817, which is the official licensed one. I made a size 5 for Littles, who normally wears a 4T, and it fits fine with some room to grow.

The fabric is all Symphony broadcloth from Joann's. This is the cheapest kind of broadcloth that Joann's carries, and if I were to do this again, I think I'd use the next "step up." The Symphony stuff really does feel kinda thin and cheap. Because it is, I guess :)

Despite using the cheapie broadcloth, all the fabric cost about $20, which is about as much as a ready-to-wear Snow White dress! But this does include some nice extras, like the cape. (Which Littles has started wearing independently of the Snow White dress -- for example, she'll put it over her Silvermist costume and call herself "Super Silvermist!") Besides, those stupid store-bought dresses always start falling apart within days. Even with the cheapie broadcloth, this one is holding up much better.

Good thing, because as I implied earlier, I'm not 100% sure which was more time consuming, moving houses or sewing this costume :) That's a bit of an exaggeration, but really, this did take a while to sew. It wasn't particularly hard, there are just a lot of pieces to cut out and put together. Still, I think the end result was worth it.

I followed the pattern pretty closely, except:

  • I used my serger on most seams, rather than my sewing machine. The pattern has a 5/8" seam allowance, so before sewing a seam, I'd draw a line 3/8" from the edge, and serge on that line. The serger adds another 1/4" seam allowance, so that's just right.
    There were only a few non-straight-line raw seams, mostly around the armholes. For those, I had to sew a basting line anyway to do the gathers, so I sewed the basting line at 3/8" in and then tried to serge along the basting line.
  • I skipped the collar. I worked on it one night and couldn't figure it out, and I had way too much other stuff going on in my life to spend a ton of time messing with it.
  • I used snaps, rather than velcro, to secure the cape to the dress (less likely to shift/come apart), and velcro, rather than a zipper, on the back opening (easier to get on/off independently).
  • I goofed initially, and sewed the skirt onto the bodice the wrong way! So the seam was on the outside of the dress. Oops. I had to cut it off and re-serge it. In the process, I think the bodice lost a little of its "definition" -- if you look at a picture of Snow White, the bodice dips down further/more sharply at the front waistline. Also, at certain angles, the piping doesn't seem to match up quite right with the dip in the bodice. I might try to fix it up a bit, but it does look OK as-is, for the most part.

Here are a few more shots...

The headband has been a big hit as well. I don't love it -- I put glue all along the top of the headband to secure the fabric, and you can see the glue line even now that it's dried. I should have just put glue on the bottom of the headband. But anyway, I guess the important thing is that Littles loves it so much that she wants to wear it to school practically every day. And I have a few more of these headbands (I could only find a 3-pack of suitably sized headbands) and plenty more fabric to use to cover them, and these are super easy to make!

IMG_0767

Another shot of the cape...

IMG_0804

With Noob... I wanted to make him a Dopey costume to match, but simply ran out of time. And this might be the last year I could coerce him into wearing a costume to match his big sister's. Oh well.

IMG_0762

So that's that! I'll see you again once my sewing room is set up :)